Friday, April 26, 2013

Monthly Quilt Group

Has it really been that long since I posted something?  Yes!  According to my Monthly Quilt Group it's been just forever.  Needless to say they were laying the guilt on pretty thick at our last get together.  All in good fun of course ;-)
 
Not that I haven't been busy with several projects its just that two of them I can't write about yet and the other two are still at the same stage as the last time I wrote about them.  So I've got some fun show and tell shots of the project that each of the Group members are working on - except the other Deb, for some reason I didn't get any pictures of her project.
 
Here are the rest of the gals with their quilts.  First up is Jane and the Houses BOM quilt.  I love the secondary pattern created by the two toned Courthouse Steps blocks.
 
 
Here's a close up of it.
 
 
Next is Carol.  She's been working on these beautiful applique blocks for quite a while now.  It looks wonderful all put together.  The black background is so striking! 
 
 
Here's a closeup of Carol's wall hanging. Those flower colors are just popping off that black.
 
 
Here's my sister Dutchy just back from her annual trip to Florida.  This snowbird was busy while she was down there for 3 months.  Golfing, swimming, and even teaching a quilting class!  She has promised to share her pictures of the quilt that her quilting class made and raffled off.  When I get them I'll be writing a post to share with everyone.
 
 
Her project is hexagons.  She's making a table runner to go in her kitchen.  I didn't get a clear picture but you can see how she fussy cut those fun chickens She'll have 3 of these hexagon chicken blocks on a beige background for the full table runner.
 
 
This is Tami and her Wonky Churn Dash quilt.  This was a class at the local quilt shop taught by Charlene, one of the other gals in our little group.  Wish I had been able to make it for this class.  Great colors! 
  
 
And she added that fun applique border. She's a whiz at applique, not just fast, her hand work is also beautiful.
 
 
 In addition to the churn dash quilt, Tami also had this cute applique wall hanging.

 
Here's a close up.  I just love those fun flowers, so pretty!


No pictures of Charlene this time, she was off to Maine to visit family. I'll catch her next month. 
 
And even though I didn't get any pictures of the other Deb's project I can tell you it is a beautiful full/queen size quilt that she is hand quilting. The blocks are hand embroidered flowers of each of the 50 states that her grandmother started. Deb is putting the finishing touches on it with beautiful floral sashing and cross-hatched hand quilting. It is just beautiful. I'm pretty sure our next get together is at her home so I will definitely take some photos of it.
 
Oh yeah, and no pictures of me this time because the project I was working on is a gift.  Besides, my face was so red in the pictures it looked like I'd been out in the sun too long.  LOL
 
A big THANK YOU to Jane for hosting this month. Jane's turn is always in April and it's always raining but this time, just for the record, NO RAIN!!!
 
See you girls next month and I promise to catch up on my blogging :o)
 

Tuesday, March 5, 2013

Layouts for Flannel Half Square Triangles

I had some fun over the weekend playing around with the half square triangles (HSQs) I made from those old flannel shirts.  The challenge has been to create a beautiful quilt from fabrics I have on-hand.  Here's what came up when I added some white flannel from my stash. 

I used the tube cutting method and it went pretty quickly.  One thing I have learned from working with the flannel is the different weights can really make a difference in how much stretch you get in the triangle.  I was careful not to press too much and kept the handling to a minimum so the whole thing came out pretty flat.  The individual HST blocks are about 5 1/2 inches square.

Layout # 1:  Diagonal lines with alternating the plaids.  Not very inspiring but I was just getting started.


Layout # 2:  Friendship Stars - again, rather typical and a bit dull.  Plus I didn't have enough white to fill in the background.


Layout #3:  This is one below I just loved!  I didn't have all the HSTs made so you kind of have to imagine where it was going.  I added some of the charms from a flannel charm pack of flannels that my mother had given me.  It just brightened up the whole layout.  I think I've got one of these layouts in my future with different fabrics from my stash.


Layout #4:  I decided to add the charms to the white corners of the HST blocks and ended up with this combination.  I just cut the charms into 4 equal squares and sewed them on "snowball" style.  Then I laid them out on the design board and mixed them around until I like the way they came together in the middle of each 4 patch.  I'm pretty sure this block has a name but I can't remember it right now. 


Anyway, the final layout looks like this.  It's really nice!  I'm probably going to add a narrow border just so the points don't get lost when I put the binding on.


And of course, Guppy is keeping a close eye on the progress from his prime vantage point at the end of the ironing board!


The top is all together and measures 31" wide by 41" long.  A nice size for a lap quilt.  Since I don't have any big pieces of flannel for the backing I'll be heading up to my sister Dutchy's house to see what she's got in her stash.  It's like shopping but it's FREE!

Stay tuned for the finish at the end of this week.

Saturday, February 23, 2013

Flannel Shirts

When I first started quilting over 12 years ago I was really interested in being able to recycle old clothes into quilts.  Then I discovered the whole world of quilt shops and speciality quilting fabrics!  It has been such a treat to be able to work with the beautiful colors and designs of these speciality fabrics but there's still the desire to create something new from something used.

I began collecting fabrics on my first trip to Lancaster PA.  My sister Dutchy and I went there with a group from our guild and on the bus I won my first fat quarter.  How exciting!  I didn't even know what a fat quarter was but I now had two of my very own.  The main reason for taking this trip to Amish country was to attend the huge quilt show but the second reason was to buy fabric.  I had no idea what I was doing but the group of seasoned veteran quilters were eager to help me out. 


Since that first fat quarter, my fabric stash has become much bigger than I ever expected.  At the beginning of the year I decided to expend some real effort to do something with all that fabric. So I've decided if I can't make something with it I'll have to get rid of the fabric.  Oh my!  I don't know if I can part with my fabric!  I know the quilters among you will understand :-)  Well, not all of it just the stuff that's been hanging around for so long I've forgotten what I was going to do with it.

I started by sorting out the fabrics into colors and weights.  I'll spare you the details but I found a stack of flannels.  This was one of those things I've been going to get around to some day.  Well, someday is now. These plaids are just two of the dozens of flannel shirts that my sister Sue gave to Dutchy after cleaning out her husbands closet.  Some of the shirts had never even been worn.  After all one man can only wear just so many shirts! Dutchy used pieces from many of the shirts to create a great lap quilt for Scott.  He loved it and Sue is still using it all these years later.  There's still a big box of flannel in the closet of Dutchy's sewing room which is on her list of things to use or lose.

 
I took these two to add in with some flannel fabrics my Mom had given me.  I had purchased some white flannel to use on the Holiday pillows I made after Christmas.  So I guess you could say this next project is a family affair! 
 
I didn't start with any particular patten in mind just large half square triangles (HST).  I wanted to try to use up as much of the flannel as possible so they are pretty big - 5 1/2 inches square.  I used the tube piecing method that I had seen on the Missouri Star Quilt Company's site. You can find the video here.  It's such a cool and fast way to make HQTs!


I've made a few blocks and they are on the design board.  I'm very happy to be getting around to recycling old clothes to make a quilt.  I have no idea what the final design will look like so stay tuned.

Friday, February 22, 2013

Pillow Case

I've started on a large quilt that I'm really excited about!  I can't show it to you just yet but I'm taking pictures as I go so you'll see it all later.  In the mean time, I've decided to try working on smaller projects in the evenings to see if I can get some stuff finished up.

I've decided to add my post over at Crazy Mom Quilts for "Finish Up Friday". I'm a big fan of her blog and love the idea of having a place to show off my (finally!) finished projects.

Last weekend I was looking at the basket beside my sewing table knowing that there were things in there that I haven't looked at in a long time. I opened the lid and sure enough, I found this pillow case project just waiting to be put together.


 Aren't those the cutest cats?  And I love the little mice running around!


Remember when pillow cases first appared at quilt shows? They were all the rage a few years back and I jumped on the band wagon. What could be easier?  This one is for a body pillow I use when my back is bothering me.  The pattern called for French Seams but I decided since I was going to use it here at home I'd just do regular seams.  It looks so fun on our bed but of course doesn't actually match the light blue color scheme ;-)

 
Here's a close up of the band.  Can you read the words?  (Pictures are still a bit off cuz I'm still futzing with the camera on my new phone. I'm hoping not to have to buy a separate camera but it's a challenge.)


So that's it for this my finish this week.  I've already started a simple flannel lap quilt for next week.  Stay tuned.

Monday, February 4, 2013

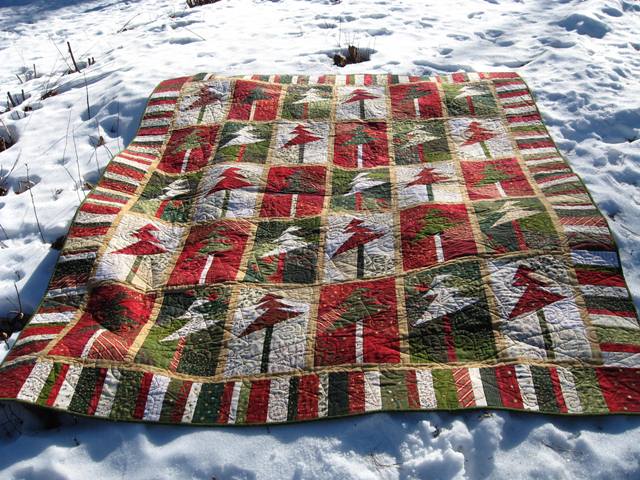
Finished Christmas Trees

For someone who has all those projects piled up I'm not getting much done!  I did manage to finish the Whacked Christmas Trees so I'll share that with you today.  If you're interested in how it all came together you can see the process in the October 2012 archives.

The quilting on this came out just lovely.  It is done with red thread on the front and gold thread on the back. My picture taking skills are not as advanced as my quilting skills but I gave it my best shot.

The quilt pattern is actually Christmas Trees!  How original right?  I had planned in my head to have stars as the quilt pattern but during the "looking" process - that's where Lorri patiently scrolls through the tons of patterns she has on her computer while I look for the one that strikes my fancy.  We started out looking at stars but when this pattern of trees came up we both went - that's it!

If you look closely in the picture above you can see, at the top and bottom center of the picture, inside the white fabrics, two upside down trees.  The squiggle is part of the connecting lines.  It's always so exciting to see the finished product.

Here's a shot of the back - I manipulated the color in the photo to highlight the quilting so it looks kind of orange but it's really a beautiful Christmas red.  The trees look like they are dancing around having a party!  Lorri did a great job and as always it was fun collaborating with her on the quilting pattern, thread choices and even the binding color.  Thanks Lorri, that shade of green was the perfect choice.
 
 
Again, sorry for the poor pictures of the quilting but how's a girl supposed to get great pictures when the cat wants to be in the photo shoot?  (Besides the cat you can also see the green binding in this picture.)


That's Alice who jumped up on the sewing table while I was in the office downloading the pictures to the computer.  She has claimed this quilt as her own but I'm putting up a good fight, this one is for me.  It is currently laying over the back of my favorite recliner just waiting for me to take a nap ;-)  She's been poking her head up under it all the way to her shoulders.  I'm not sure what she's doing but I get the feeling she thinks we can't see her when her head is covered up !!!

I did manage to get a couple of nice pictures of the whole quilt outside.  This is in the snow on the hill next to the driveway.

 
Here's my favorite, hanging on the fence.  You can't see the top row of trees but isn't it pretty?  It was bitterly cold here in NH that day and the wind was blowing so I only got a couple of shots but the lighting was much better out doors.


And finally, a close up.


I hope all my friends in the snowy states are keeping warm and dry this winter!

As for that pile of other quilting project that's waiting for me I have actually started on a couple of them - Birdies, Bunnies, and a red-white-blue scrap quilt.  Did I mention I also went shopping for fabric?  Call me crazy but I'm looking for just the right shades of blue and cream for someone special.

I'll see if I can get the cat off the sewing table long enough to get some good pictures and write again soon.  Stay tuned.

Friday, January 11, 2013

A New Year With Lots To Do

It's a new year and already I've got a list a mile long of quilting projects I want to work on including trying out a new format for my blog. Change is good right?   :o)

I started this pillow top just before Christmas. I wanted something quick to work on while my Whacked Christmas Trees were at the quilter. I found the free pattern, Holiday Lane at Jill Finley's website, Jillily Studio.


 The piecing for the background was really easy and I had all the Christmas fabrics out so I decided to make four of them. The finished size on the pattern says 35" x 15" including the flange. Mine is about that size but I'm not going to have a flange. I bought a pillow form that is 28"x14" so I"ll make it to fit the form.


I used this fun fabric for the night sky. I found it at Joann's. It's the same print as the red I used on the back of the Christmas trees quilt.


I'm experimenting with the whites. I bought some creamy minky, some white wool felt, some white with glitter, and a white-on-white cotton that has some shiny bits in it as well. So far I've only made the one with the felted wool. It was fluffy when I started out but when I pressed the fusible on it kind of flattened out. I'll be checking with the Friday quilt group this month to see if they can tell me what's what with working on this stuff. It's kind of stiff so I'm not sure I'd use it again for anything. I'll let you know how the others turn out.

I'm finishing up the binding my Whacked Christmas Trees quilt and will post some pictures of the fun quilting that Lorri did for me as soon as I can figure out the picture problem UGH!

Planning what to do for quilts in 2013 was easy.  I've been mulling over some quilts for the family including Sally, Roddy, Sue, Dutchy, Georgie, and Basil. The biggest difference between these quilts and the ones for the Girls is I will be asking for a little input from the people getting the quilts.  The Girls didn't know what they were getting and that worked out just fine but sometimes caused me to delay while I fretted over color choices and patterns.  The six quilts for The Girls took me the better part of 2011 and 2012 so God only knows how long it will take for the Family Quilts but I'm excited to get started.

And the list of WIPs is pretty long too. 

These actually have been started: Steven's T-shirt quilt; my 1930's Bunny quilt; the Cone Flowers; Caroline's Mermaid quilt; campers; running shoes; and a snowball baby quilt.

These I have the fabrics for:  Rachel's Baskets; Birds;scrap quilt from The Girls scraps;  Fruit Bottom Ladies . . . . the list just goes on and on!


It will be interesting to see how far I get on any of these projects.  In order to inspire myself to finish some of them I'm seriously thinking of joining the "Finish Up Fridays" on Crazy Mom Quilts blog.  I'd love to be able to finish up a project and post it on her site.  She's one of my favorite quilt bloggers.

So hold on to you're hats 2013 is about to begin.  Happy New Year!


Monday, December 10, 2012

It's Only Rock'n'Roll - But I Like It !

This past weekend did not include sewing of any kind but it did include lots of fun!  We headed of to Brooklyn NY to see The Rolling Stones concert.


If you haven't been to the Barclay's Center in Brooklyn NY it's worth the 4-5 hour drive from NH. The arena is very new - just opened this year. The seats are padded and big enough so you didn't feel like you were crammed in even for those of us who are the large and lovely size ;-) There are plenty of concession stands with lost of variety of food from burgers to sushi and a full bar not just beer.  Before the show they even had vendors selling beer in the stands like a baseball game.
 
We had GREAT seats!  Just past half court and about 20 rows up.  The crowd was filled with old fans and new ones - reminded me of a Grateful Dead show where the whole family shows up including Gramma and Grampa LOL 
 

That's me standing in front of the stage.  I tried to take pictures during the show but none of them came out very good, most of them are blurry . . .


or dark . . . or both 


and some have big fat heads in the way (that's Keith Richards on the left playing the guitar).


So I'll just have to refer you to other sources like this Rolling Stones site or The New York Times or you can just Google the rolling stones at the Barclay's center and get tons of links and way better pictures! 

The show was excellent!  And this was not my first time at a Stones show so I'm speaking from experience.  The Stones are still rockin' and rollin' even though they are all pushing 70.  It was an inspiration to see them.  But I have to say, the jumbo-tron was not at all flattering to any of them LOL!  They have never had it in the "handsome" category but then I certainly would not want to see myself, with all my imperfections, projected 20 feet in the air!

The sound was great and these guys can still sing and play like they used to.  It's something to see and hear, I danced and sang along the whole time.  Here's some videos from YouTube of a couple of my all time favorites: Paint It Black and Brown Sugar.  They played all the hits and some real oldies like the Beatles "I Want To Be Your Man".  Sorry Betty, no Shattered this time.  This video is the tail end of Jumpin' Jack Flash and all of Satisfaction.  These were the last songs of the show and they were still sounding great.

We had a great time and hated to see it end.  The Big Guy is convinced they will be back next summer!

And for those of you expecting a quilting post, stay tuned.  I got the Christmas Tree quilt back from the quilter last week so I'll be doing the binding this week to get it on the sofa before Christmas.

Saturday, December 1, 2012

Quick Christmas Projects

OMG!  I just sat down to see if there was a quick project that I could do this weekend and I found so many I can't believe my luck.  I not only found some fun free patterns but I also found a couple of new sites that I'll be keeping my eye on.

First I stopped by the Moda Bake Shop, which is one of my regular stops.  They have tons of free patterns, most are geared to pre-cuts but you can certainly do your own cutting and achieve the same results.  The first two looked simple enough, 

a herringbone pot holder

 
 and a patchwork wine gift bag.  Not bad but I kept scrolling.

 
Next was this mystery quilt.  OK, not a quick project but I want to make an Irish Chain quilt one of these days so it caught my eye and I opened the recipe. 


Well, one thing lead to another - as it always does on the Internet - and I found myself here at Sew We Quilt.  Its a site where you can sign up to do a project, post your finished work, and then "blog hop" around to see what other people have done with the same pattern.  Kind of a combination of a challenge, a show and tell, and a driver to get people to your site.  (Inspiring if you need motivation to stay on task to finish a project.)  Tons of fun stuff here!

Anyway, that site lead me to Jillily Studio and this fun "Holiday Lane Pillow".


I printed out the pillow and these "Very Merry" place mats.


She has other free patterns that look like fun as well.  Isn't the Internet a fascinating place?  Some days I can't find anything of value and then there are days like these where I could have just kept going and going.  You never know what you'll find. 

I don't know about you but I love getting inspired so early in the morning! 

Now - housework or sewing?  Hmmmm . . .  what will you be doing this weekend?

Wednesday, November 28, 2012

Whacked Tree Borders

We had a quiet day on Thanksgiving since I had to work the next day.  I cooked a half a turkey - interesting . . .  I had to get a fresh one so they could cut it in half for me.  Honestly, is not my favorite.  I don't know about you but I was raised on frozen turkeys and I like them better but that's just me.  I'm kind of out of practice on my cooking so maybe I didn't cook it right!?  But the homemade mashed potatoes and gravy were delicious!  (I have to remember to write down the story about how much my family loves gravy.)

Anyway, it's coming up to the finish line for the Whacked Christmas Tree quilt.  I've been making the borders.  I did the piano keys the same way I did them on the pumpkin quilt.  Since most of the fabrics were fat quarters, and the pattern was placed along the top and left edges of the stacks, the strips ended up being about the same length.

I cut all the left over pieces into strips.  I didn't pick any one size, just randomly cut them so they are different widths.


Of course you know I couldn't stand that mixed up pile of strips!  I had to straighten them all out and lay them out flat - I was laughing at myself as I did this because I'm so anal about it!!!  Or as one of my quilting friends put it "you really are a linear thinker"  ;o)

I had hoped I could just put them all in this bucket and pull them out one at a time but I just couldn't do it LOL!


So I lined them up according to color and a little bit by size (wide vs narrow) then worked from there.  First I sewed three strips together being sure to mix up the widths and patterns.


Next I sewed these strip sets to each other to get larger strip sets and so on . . .


Then I trimmed up one end.
 
 
And finally cut the large strip sets to the 6 inch wide "bricks" I needed.
 
 
Then I sewed these bricks end to end to get the piano key borders.  This is about a scrappy as my poor little brain can handle.
 
 
Tonight I'll be putting the top and bottom borders on with corner stones shown below.  Then the whole thing will be ready to take to the quilter on Friday.  She promised to have it back to me before Christmas (she usually only takes a week) so if I'm really quick I'll get the binding on before Christmas too.
 
 
In other news (in case you were wondering), I finally finished the second apron for Aunt Doris and got them in the mail today.  The floral print on this one is a bit more exciting.  I'm not sure if she'll like it but I think it came nice.  I'd love to do one more for her, with Christmas fabric.  I'll see how it goes.

 
I had some fun playing with the piping. I think I need to get a piping foot that has a little groove in it. I saw one on a quilting show and it was really cool. 

I've been thinking a lot lately about getting a new machine.  I know I've talked about it but I haven't actually ventured out to shop yet.  I'm thinking I'd like more attachments/feet.  I'd also like to try quilting smaller projects on my own so I'll need more space between the needle and the machine. 

I'm not interested in lots of embroidery but I'd like to be able to do simple labels and a few decorative stitches.  I saw a table runner that had the makers name embroidered in the binding.  Since I'm not a fan of "big honking white" labels (LOL) plastered on the back I thought embroidery in the binding might be a nice alternative.  For now I'm still thinking it over.

Sewing may take a back seat for a while as the big kitchen project on the rental is starting in January.  I'll probably post some construction pictures as things go along.  Until then I hope to get a few hand work projects cut out and prepped for take-along.

Stay tuned!

PS - How do you like my new profile picture?

Tuesday, November 13, 2012

An Apron for Aunt Doris

I recently attended a bridal shower for my Great Niece Heather.  You may have see the post I did that showed the aprons I made for the brides maids.  They were such a hit with my Aunt Doris that she asked me to make her one.  Not exactly like those, just a half apron.  And a little bit longer if possible.


Aunt Doris with my brother Roddy
Who can resist a request from their Aunt who is also their Godmother?  Certainly not me!  So I promised to make her an apron and bring it to the wedding a few weeks later.  Well, when the wedding day came I didn't have it made. Sure enough she asked me about it and I felt really bad.  I had it in the back of my mind for the whole time but kept thinking how long did she want it exactly? And I wasn't sure what colors she has in her kitchen.  (Now I'm feeling even more guilt because why don't I go visit her; she only lives an hour away!)
 
Before the wedding got started I got the specifics:  blue and purple but don't make purple, and just above the knee, but don't go to any trouble.  I had her stand next to me and since our waist and knees were at the same height I now knew how long to make it.
 
Naturally I asked my sister Dutchy if she had any blue floral in her stash and she came up with these three and one other which I coordinated with small prints from my own stash.  These didn't make the first cut but I'll be doing a couple more in a few weeks.  Love the one on the left with the blue and purple!


These are the fabrics that made the cut, a pretty blue and yellow floral with green accents.


I already had a pattern that I had bought ages ago but never used.  It was kind of fun working with pattern pieces again.  It's been so long I had to actually read the directions LOL!


It all came back to me and I spend most of the time remembering all the sewing I had done with my mother. She would always say "now do it like this" and then show me.  As I worked I could hear her telling me which way to put the pins in and where to place the pattern pieces. 

"Fold the fabric this way"
"Match up the dots"
"See how the points are on both pieces?"
"Yes you have to iron ALL the pieces as you go"
"Pay attention!"
"No! No! don't sew over the pins"
"Slow down, they're not giving out any prizes for finishing first"

If I did it wrong she made me do it again and again until I got it right.  I wasn't a quick study but apparently I learned. Funny how now it seems to me that she was patient but at the time it didn't feel that way!


I had forgotten how easy it is to do a gathered skirt on a waist band.  That brought back a whole other set of memories - Home Economics!  The very first project for the class was a drindle skirt. All gathers at the waist, a zipper, a button hole, and a 4" hem. Does anyone wear a 4" hem besides children? I hated it! I thought was just hideous and made my hips look huge. LOL! But it was a great teaching tool.

The teacher was always giving us hints and tips about how to dress and keep up our appearance.  Not only did we hear this stuff at home but now we had to hear it at school.

"Never wear anything that has a safety pin in it." (I took this one to heart until I got to a point where every blouse gaped at the chest.)
"Don't wear nylons with runs." (this was before panty hose :o)
"Young ladies should not wear girdles, it makes you have weak stomach muscles." (Now we call them Spanks and I wouldn't be caught dead without one under a pretty dress!)
She even gave us a demonstration of how to put on a bra (over her clothes of course) - first, hook it in the front, turn it around so the hooks are in the back, pull the straps up, grab the straps, bend over and shake everything into place. I still crack up when I think of it! 

See what the kids are missing with no Home Ec in school?  On second thought she'd probably be arrested

So finally, here's the apron I made for Aunt Doris and it was certainly no trouble!  In fact it was a day of fun and fond memories.  I'll be mailing it off in a day or two. I hope she likes it!