Here's a finish that's been waiting to happen for over a year! It was supposed to be a quick project to pull together before Christmas 2012 and have ready for gift giving.
HA! I always have great ideas at the last minute and those are the ones that typically turn into UFOs (unfinished objects).
The pattern is "Holiday Lane Pillow" . Of course when I saw it and thought it was so cute and would be so quick I wasn't planning on making more than one. Then I pieced together the first one. It really was so fast I thought well, all the fabrics are here and I'm moving right along, why not make 3 more! Aren't they just adorable? The trees, windows, and snow on the roofs are all fusible applique.
I experimented with the white fabrics a bit. I tried a brushed flannel but it was kind of stretchy so I didn't use it. Then I tried a "craft" fabric that's fuzzy on one side and smooth on the other. The feel of it was great and it looked just like real snow. The problem was as soon I started pressing the pieces down it lost it's fuzz and didn't look that great any more. That's actually the one I finished into the pillow above.
I finally settled on a white that has a bit of a shine to it. Kind of looks like snow that has melted and refrozen. It's really pretty!
Once all the panels were made I wanted to include some embroidery to perk it up a bit. This meant more time was need and they wouldn't be ready for Christmas so I put the whole project aside until spring last year.
When I picked the project up again I figured it was early enough in the year and I'd have them all done by Christmas (2013). I embroidered the first one and really liked it. Here's a close up.
In the meantime, I was working a quilt for my sister-in-law (more on that later). So again the village pillows got put aside.
The next time I picked it up was to have something to take to my monthly quilt group. By now I had forgotten which stitch I used to outline the door and window so I had to look it up.
I found this great website with a whole library of hand embroidery tutorials. If you're interested in adding some new stitches to your embroidery you should check out Needle'n'Thread by Mary Corbet. Be prepared to be inspired! I think I've watched almost every one of her videos multiple times and it has sparked a new interest for me in embroidery. Oh great, another whole world of UFOs!!!
I finally completed all the embroidery over the weekend and finished the first one as a pillow. I didn't actually quilt it so technically it's not a "quilt" project but it's done. Now, I really like the pillow but honestly, the thrill is gone and I don't want to make any more pillow covers. At this point I'm torn between making them into individual table runners or just sewing them all together as a small quilt. This much I do know, the unfinished ones are heading back into the UFO pile. Or maybe I can just call these WIPs (Works In Process)!
Do you have projects like this that keep coming back begging to be finished?
Showing posts with label Christmas. Show all posts
Saturday, February 1, 2014
Monday, February 4, 2013
Finished Christmas Trees
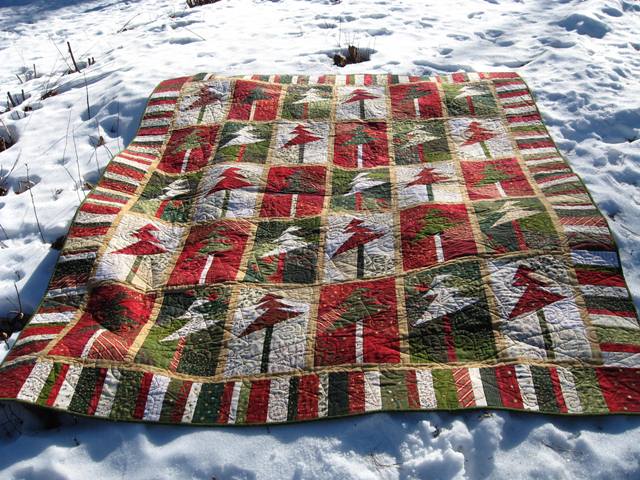
For someone who has all those projects piled up I'm not getting much done! I did manage to finish the Whacked Christmas Trees so I'll share that with you today. If you're interested in how it all came together you can see the process in the October 2012 archives.
The quilting on this came out just lovely. It is done with red thread on the front and gold thread on the back. My picture taking skills are not as advanced as my quilting skills but I gave it my best shot.
The quilt pattern is actually Christmas Trees! How original right? I had planned in my head to have stars as the quilt pattern but during the "looking" process - that's where Lorri patiently scrolls through the tons of patterns she has on her computer while I look for the one that strikes my fancy. We started out looking at stars but when this pattern of trees came up we both went - that's it!
If you look closely in the picture above you can see, at the top and bottom center of the picture, inside the white fabrics, two upside down trees. The squiggle is part of the connecting lines. It's always so exciting to see the finished product.
Here's a shot of the back - I manipulated the color in the photo to highlight the quilting so it looks kind of orange but it's really a beautiful Christmas red. The trees look like they are dancing around having a party! Lorri did a great job and as always it was fun collaborating with her on the quilting pattern, thread choices and even the binding color. Thanks Lorri, that shade of green was the perfect choice.
I did manage to get a couple of nice pictures of the whole quilt outside. This is in the snow on the hill next to the driveway.
And finally, a close up.
I hope all my friends in the snowy states are keeping warm and dry this winter!
As for that pile of other quilting project that's waiting for me I have actually started on a couple of them - Birdies, Bunnies, and a red-white-blue scrap quilt. Did I mention I also went shopping for fabric? Call me crazy but I'm looking for just the right shades of blue and cream for someone special.
I'll see if I can get the cat off the sewing table long enough to get some good pictures and write again soon. Stay tuned.
The quilting on this came out just lovely. It is done with red thread on the front and gold thread on the back. My picture taking skills are not as advanced as my quilting skills but I gave it my best shot.The quilt pattern is actually Christmas Trees! How original right? I had planned in my head to have stars as the quilt pattern but during the "looking" process - that's where Lorri patiently scrolls through the tons of patterns she has on her computer while I look for the one that strikes my fancy. We started out looking at stars but when this pattern of trees came up we both went - that's it!
If you look closely in the picture above you can see, at the top and bottom center of the picture, inside the white fabrics, two upside down trees. The squiggle is part of the connecting lines. It's always so exciting to see the finished product.
Here's a shot of the back - I manipulated the color in the photo to highlight the quilting so it looks kind of orange but it's really a beautiful Christmas red. The trees look like they are dancing around having a party! Lorri did a great job and as always it was fun collaborating with her on the quilting pattern, thread choices and even the binding color. Thanks Lorri, that shade of green was the perfect choice.
Again, sorry for the poor pictures of the quilting but how's a girl supposed to get great pictures when the cat wants to be in the photo shoot? (Besides the cat you can also see the green binding in this picture.)
That's Alice who jumped up on the sewing table while I was in the office downloading the pictures to the computer. She has claimed this quilt as her own but I'm putting up a good fight, this one is for me. It is currently laying over the back of my favorite recliner just waiting for me to take a nap ;-) She's been poking her head up under it all the way to her shoulders. I'm not sure what she's doing but I get the feeling she thinks we can't see her when her head is covered up !!!I did manage to get a couple of nice pictures of the whole quilt outside. This is in the snow on the hill next to the driveway.
Here's my favorite, hanging on the fence. You can't see the top row of trees but isn't it pretty? It was bitterly cold here in NH that day and the wind was blowing so I only got a couple of shots but the lighting was much better out doors.
And finally, a close up.
I hope all my friends in the snowy states are keeping warm and dry this winter!
As for that pile of other quilting project that's waiting for me I have actually started on a couple of them - Birdies, Bunnies, and a red-white-blue scrap quilt. Did I mention I also went shopping for fabric? Call me crazy but I'm looking for just the right shades of blue and cream for someone special.
I'll see if I can get the cat off the sewing table long enough to get some good pictures and write again soon. Stay tuned.
Labels:
Alice,
binding,
Christmas,
piano key borders,
trees
Saturday, December 1, 2012
Quick Christmas Projects
OMG! I just sat down to see if there was a quick project that I could do this weekend and I found so many I can't believe my luck. I not only found some fun free patterns but I also found a couple of new sites that I'll be keeping my eye on.
First I stopped by the Moda Bake Shop, which is one of my regular stops. They have tons of free patterns, most are geared to pre-cuts but you can certainly do your own cutting and achieve the same results. The first two looked simple enough,
Well, one thing lead to another - as it always does on the Internet - and I found myself here at Sew We Quilt. Its a site where you can sign up to do a project, post your finished work, and then "blog hop" around to see what other people have done with the same pattern. Kind of a combination of a challenge, a show and tell, and a driver to get people to your site. (Inspiring if you need motivation to stay on task to finish a project.) Tons of fun stuff here!
Anyway, that site lead me to Jillily Studio and this fun "Holiday Lane Pillow".
I printed out the pillow and these "Very Merry" place mats.
She has other free patterns that look like fun as well. Isn't the Internet a fascinating place? Some days I can't find anything of value and then there are days like these where I could have just kept going and going. You never know what you'll find.
I don't know about you but I love getting inspired so early in the morning!
Now - housework or sewing? Hmmmm . . . what will you be doing this weekend?
First I stopped by the Moda Bake Shop, which is one of my regular stops. They have tons of free patterns, most are geared to pre-cuts but you can certainly do your own cutting and achieve the same results. The first two looked simple enough,
a herringbone pot holder
and a patchwork wine gift bag. Not bad but I kept scrolling.
Next was this mystery quilt. OK, not a quick project but I want to make an Irish Chain quilt one of these days so it caught my eye and I opened the recipe.
Well, one thing lead to another - as it always does on the Internet - and I found myself here at Sew We Quilt. Its a site where you can sign up to do a project, post your finished work, and then "blog hop" around to see what other people have done with the same pattern. Kind of a combination of a challenge, a show and tell, and a driver to get people to your site. (Inspiring if you need motivation to stay on task to finish a project.) Tons of fun stuff here!
Anyway, that site lead me to Jillily Studio and this fun "Holiday Lane Pillow".
I printed out the pillow and these "Very Merry" place mats.
She has other free patterns that look like fun as well. Isn't the Internet a fascinating place? Some days I can't find anything of value and then there are days like these where I could have just kept going and going. You never know what you'll find.
I don't know about you but I love getting inspired so early in the morning!
Now - housework or sewing? Hmmmm . . . what will you be doing this weekend?
Labels:
Christmas,
gift bag,
pillow,
place mats,
potholder
Wednesday, November 28, 2012
Whacked Tree Borders
We had a quiet day on Thanksgiving since I had to work the next day. I cooked a half a turkey - interesting . . . I had to get a fresh one so they could cut it in half for me. Honestly, is not my favorite. I don't know about you but I was raised on frozen turkeys and I like them better but that's just me. I'm kind of out of practice on my cooking so maybe I didn't cook it right!? But the homemade mashed potatoes and gravy were delicious! (I have to remember to write down the story about how much my family loves gravy.)
Anyway, it's coming up to the finish line for the Whacked Christmas Tree quilt. I've been making the borders. I did the piano keys the same way I did them on the pumpkin quilt. Since most of the fabrics were fat quarters, and the pattern was placed along the top and left edges of the stacks, the strips ended up being about the same length.
I cut all the left over pieces into strips. I didn't pick any one size, just randomly cut them so they are different widths.
Of course you know I couldn't stand that mixed up pile of strips! I had to straighten them all out and lay them out flat - I was laughing at myself as I did this because I'm so anal about it!!! Or as one of my quilting friends put it "you really are a linear thinker" ;o)
I had hoped I could just put them all in this bucket and pull them out one at a time but I just couldn't do it LOL!
So I lined them up according to color and a little bit by size (wide vs narrow) then worked from there. First I sewed three strips together being sure to mix up the widths and patterns.
Next I sewed these strip sets to each other to get larger strip sets and so on . . .
I had some fun playing with the piping. I think I need to get a piping foot that has a little groove in it. I saw one on a quilting show and it was really cool.
I've been thinking a lot lately about getting a new machine. I know I've talked about it but I haven't actually ventured out to shop yet. I'm thinking I'd like more attachments/feet. I'd also like to try quilting smaller projects on my own so I'll need more space between the needle and the machine.
I'm not interested in lots of embroidery but I'd like to be able to do simple labels and a few decorative stitches. I saw a table runner that had the makers name embroidered in the binding. Since I'm not a fan of "big honking white" labels (LOL) plastered on the back I thought embroidery in the binding might be a nice alternative. For now I'm still thinking it over.
Sewing may take a back seat for a while as the big kitchen project on the rental is starting in January. I'll probably post some construction pictures as things go along. Until then I hope to get a few hand work projects cut out and prepped for take-along.
Stay tuned!
PS - How do you like my new profile picture?
Anyway, it's coming up to the finish line for the Whacked Christmas Tree quilt. I've been making the borders. I did the piano keys the same way I did them on the pumpkin quilt. Since most of the fabrics were fat quarters, and the pattern was placed along the top and left edges of the stacks, the strips ended up being about the same length.
I cut all the left over pieces into strips. I didn't pick any one size, just randomly cut them so they are different widths.
Of course you know I couldn't stand that mixed up pile of strips! I had to straighten them all out and lay them out flat - I was laughing at myself as I did this because I'm so anal about it!!! Or as one of my quilting friends put it "you really are a linear thinker" ;o)
I had hoped I could just put them all in this bucket and pull them out one at a time but I just couldn't do it LOL!
Next I sewed these strip sets to each other to get larger strip sets and so on . . .
Then I trimmed up one end.
And finally cut the large strip sets to the 6 inch wide "bricks" I needed.
Then I sewed these bricks end to end to get the piano key borders. This is about a scrappy as my poor little brain can handle.
Tonight I'll be putting the top and bottom borders on with corner stones shown below. Then the whole thing will be ready to take to the quilter on Friday. She promised to have it back to me before Christmas (she usually only takes a week) so if I'm really quick I'll get the binding on before Christmas too.
In other news (in case you were wondering), I finally finished the second apron for Aunt Doris and got them in the mail today. The floral print on this one is a bit more exciting. I'm not sure if she'll like it but I think it came nice. I'd love to do one more for her, with Christmas fabric. I'll see how it goes.
I've been thinking a lot lately about getting a new machine. I know I've talked about it but I haven't actually ventured out to shop yet. I'm thinking I'd like more attachments/feet. I'd also like to try quilting smaller projects on my own so I'll need more space between the needle and the machine.
I'm not interested in lots of embroidery but I'd like to be able to do simple labels and a few decorative stitches. I saw a table runner that had the makers name embroidered in the binding. Since I'm not a fan of "big honking white" labels (LOL) plastered on the back I thought embroidery in the binding might be a nice alternative. For now I'm still thinking it over.
Sewing may take a back seat for a while as the big kitchen project on the rental is starting in January. I'll probably post some construction pictures as things go along. Until then I hope to get a few hand work projects cut out and prepped for take-along.
Stay tuned!
PS - How do you like my new profile picture?
Labels:
apron,
Christmas,
piano key borders,
scraps
Thursday, October 25, 2012
Whacked Trees: Row by Row
Slowly but surely I've been nibbling away at the Whacked Christmas Trees. After all 30 blocks were constructed I laid them out on the design wall. I took a step back and all I could see was one HOT MESS!
You all know I'm not a fan of scrappy quilts yet when I did the wacky pumpkin quilt it turned out beautifully. In fact it's one of my favorites! I keep telling myself this one's going to be great too and I do love each and every fabric in it but boy I'm not in love with it yet.
The blocks by themselves are really cute. Even side by side on these blue trays I use for organizing they seem to be fine together. Hopefully, once I get the final border on I'll like it more.
In an attempt to give myself some order in the scrap heap on the wall I decided to add in some sashing. I found this great fabric that I had used as a backing for Betty's quilt and as one of the blocks for Kim's quilt. (The only one of The Girls quilts that's not been delivered yet!)
This fabric is a favorite of mine, from Joann's, because it's so versatile. I mean really, what other fabric goes with cookies, camping, cats, birds, beer, and now Christmas trees!
Here's a peek at some of the Whacked Christmas tree blocks with their sashing. I used a 1" sashing to go along with the skinny tree trunks. It's kinda "growing" on me!
By the way, several of you have asked me about my story for Mary's quilt. All I can say is I cried when I delivered it and I keep getting choked up when I try to write the story! Here's Alice helping me put the binding on Mary's quilt.
You all know I'm not a fan of scrappy quilts yet when I did the wacky pumpkin quilt it turned out beautifully. In fact it's one of my favorites! I keep telling myself this one's going to be great too and I do love each and every fabric in it but boy I'm not in love with it yet. The blocks by themselves are really cute. Even side by side on these blue trays I use for organizing they seem to be fine together. Hopefully, once I get the final border on I'll like it more.
In an attempt to give myself some order in the scrap heap on the wall I decided to add in some sashing. I found this great fabric that I had used as a backing for Betty's quilt and as one of the blocks for Kim's quilt. (The only one of The Girls quilts that's not been delivered yet!)
This fabric is a favorite of mine, from Joann's, because it's so versatile. I mean really, what other fabric goes with cookies, camping, cats, birds, beer, and now Christmas trees!
Here's a peek at some of the Whacked Christmas tree blocks with their sashing. I used a 1" sashing to go along with the skinny tree trunks. It's kinda "growing" on me!
Hang in there, I'll get it written soon I promise.
Thursday, October 18, 2012
Whacked Trees; the White Blocks
Work continues on the Whacked Christmas trees. I've been calling them "Whacked" because the cutting method is similar to Stack and Whack but with a twist. They also are wacky looking!
The blocks with the green backgrounds and the ones with the red backgrounds are all done. The white backgrounds are next and I really love the prints and colors! This has been a fun and interesting quilt to make.
For each block it was easy to do the tree trunks, there weren't that many pieces and I could see how they needed to be aligned to account for the 1/4" seams. The top of the trunk section in the picture below was trimmed to give a straight edge but it wasn't straight when I first pieced it.
Piecing the tree body was where the challenges started and continued! There's lots of angles which makes for lots of funky alignments. Before you can add on the next pieces you need to straighten up the edge your going to sew it on to. Can you see the uneven edge between the red tree top and the polka dot piece in the picture below? Once that was trimmed I sewed on the last triangle to finish the block.
By the time I got to the white blocks I had finally figured out that moving that top red tree piece over so that the center of the red triangle lined up with the point of the tree piece below it the tree looked "right". It's supposed to look like it's about to topple off. As I made the adjustment to each of the white blocks I congratulated myself on how clever I was being!
Now to square them up. I measured the first one on the pile. It was just a liiiittle smaller than the green ones! Oh no not again! You guessed it, they were ALL just a little bit too small. By shifting the pieces over I had moved the out edges making the width smaller. I didn't catch on that it was happening when I did the green ones. When I made the additional adjustment to the white ones were all off even more then the green ones.
So I trimmed all the white ones to the smaller size, then I trimmed all the red ones (again), then I trimmed all the green ones (again)! Finally, the blocks are all the same size. PHEW!
What would Dolly say? Don't break your arm patting yourself on the back, you're going to need it to fix your mistakes!
Off to the sewing room to sew all 30 of those Whacky Christmas Trees together.
The blocks with the green backgrounds and the ones with the red backgrounds are all done. The white backgrounds are next and I really love the prints and colors! This has been a fun and interesting quilt to make.
For each block it was easy to do the tree trunks, there weren't that many pieces and I could see how they needed to be aligned to account for the 1/4" seams. The top of the trunk section in the picture below was trimmed to give a straight edge but it wasn't straight when I first pieced it.
Piecing the tree body was where the challenges started and continued! There's lots of angles which makes for lots of funky alignments. Before you can add on the next pieces you need to straighten up the edge your going to sew it on to. Can you see the uneven edge between the red tree top and the polka dot piece in the picture below? Once that was trimmed I sewed on the last triangle to finish the block.
By the time I got to the white blocks I had finally figured out that moving that top red tree piece over so that the center of the red triangle lined up with the point of the tree piece below it the tree looked "right". It's supposed to look like it's about to topple off. As I made the adjustment to each of the white blocks I congratulated myself on how clever I was being!
Now to square them up. I measured the first one on the pile. It was just a liiiittle smaller than the green ones! Oh no not again! You guessed it, they were ALL just a little bit too small. By shifting the pieces over I had moved the out edges making the width smaller. I didn't catch on that it was happening when I did the green ones. When I made the additional adjustment to the white ones were all off even more then the green ones.
So I trimmed all the white ones to the smaller size, then I trimmed all the red ones (again), then I trimmed all the green ones (again)! Finally, the blocks are all the same size. PHEW!
What would Dolly say? Don't break your arm patting yourself on the back, you're going to need it to fix your mistakes!
Off to the sewing room to sew all 30 of those Whacky Christmas Trees together.
Labels:
Christmas,
fat quarters,
freezer paper,
scrappy,
trees
Friday, October 5, 2012
Stacked Christmas Trees
Here's a project I've been wanting to do for a very long time. The pattern is "Tree's Up! Lights On!" from Pieces from my Heart. I bought it in 2010 just after I finished my pumpkin quilt, which is done in the same stack and swap style.
This quilt takes 30 fat quarters so it's great for fat quarter bundles if you don't want to pick the individual fabrics. I had lots of Christmas fat quarters that I had bought specifically for this quilt. I also needed to pick though my stash for some additional pieces that I cut into fat quarters.
I love that I'm working on a Christmas project and it's only October!
The last time I did this technique I was in a class with about 8 other ladies so it was hard to really understand what I was doing. This time I made sure to read the directions a couple of times before I started. I know most of you would just wing it but I LIKE reading the directions! For those of you that don't like to read the directions here's how it goes.
Start by tracing the pattern onto the paper side of a piece of freezer paper.
Be sure to include all the letters and numbers - you're going to need them! You have to cut in the exact order listed of the piece won't go together to make the trees.
Make 3 piles of 10 fat quarters each; greens, reds, and whites. Press one of the freezer paper patterns onto each pile. Now cut being certain to follow the numbers!
Keep the paper in place even after the pieces are cut. Like most quilts keeping all the pieces organized is half the battle (or fun depending on how you look at it)! Here are all the piles cut up. The next few steps involves swapping out the colors.
That wasn't so bad now was it? The next step is a bit more tricky but it's the one that gives you that scrappy look. Continue working your way around the tree and the trunk swapping out one additional top fabric and moving them to the bottom. I have to say the directions were VERY clear, much better than what I'm writing here but I thought I'd give it a try so you can get a feel for the process.
![]() |
| This is one of our favorite quilts for fall. It's big and soft and warm! |
I'm hoping the "Trees" will become our next favorite so I can give the pumpkins a rest!
This quilt takes 30 fat quarters so it's great for fat quarter bundles if you don't want to pick the individual fabrics. I had lots of Christmas fat quarters that I had bought specifically for this quilt. I also needed to pick though my stash for some additional pieces that I cut into fat quarters. I love that I'm working on a Christmas project and it's only October!
The last time I did this technique I was in a class with about 8 other ladies so it was hard to really understand what I was doing. This time I made sure to read the directions a couple of times before I started. I know most of you would just wing it but I LIKE reading the directions! For those of you that don't like to read the directions here's how it goes.
Start by tracing the pattern onto the paper side of a piece of freezer paper.
Be sure to include all the letters and numbers - you're going to need them! You have to cut in the exact order listed of the piece won't go together to make the trees.
Make 3 piles of 10 fat quarters each; greens, reds, and whites. Press one of the freezer paper patterns onto each pile. Now cut being certain to follow the numbers!
Keep the paper in place even after the pieces are cut. Like most quilts keeping all the pieces organized is half the battle (or fun depending on how you look at it)! Here are all the piles cut up. The next few steps involves swapping out the colors.
![]() |
| Each stack starts as single color. |
![]() |
| Swap the trees so that each background has a different color tree. |
![]() |
| Now swap the trunks of the tress so that each tree has a different colored trunk. |
Here's a close up of the red pile. You can see that each of the background pieces is a different fabric. The tree pieces are all the same but you could mix them up in the same way if you wanted. I haven't decided if I want to do that or not.
![]() |
| This is the easiest technique I've found for doing "scrappy" blocks. |
I think it has to do with the fact that once everything is cut up you can't move it to a different location only a different level. And the limited number of pieces allows me to stay focused on the look of a single block with the object of having no two background pieces of the same fabric.
The weather's supposed to be getting chilly this weekend so I'm looking forward to spending time sewing.
Hope you have a great weekend doing something fun!
Labels:
Christmas,
fat quarters,
freezer paper,
pumpkins,
scrappy,
trees
Subscribe to:
Posts (Atom)