Showing posts with label trees. Show all posts

Sunday, January 11, 2015

Round Robin # 5 - The Tree!

Upper left corner of "The Tree"
when I first got it.
Doing a sewing project as a group can be fun and challenging.  And for any quilter, whether experienced or just starting out, a Round Robin can also be a bit scary!  When we began our little adventure I was feeling pretty confident.  I love a challenge and now that I've been quilting for nearly 15 years I figured I could deal with a simple Round Robin.  Little did I know what was in store!

I wasn't at the first gathering where everyone exchanged projects for the first round.  I'd heard rumors from the other members: 'have you seen"'The Tree"?'  'Wait til you see "The Tree"!'  'Oh my goodness, "The Tree" !  . . . 

I was curious but I'm a rule follower so no peeking allowed and besides, I didn't want to spoil the surprise.  I like surprises!  So I didn't actually see "The Tree" until it was my turn to work on it.  When I first took it out of the bag I was not only surprised but fascinated!  The trunk has several layers of fabrics with different textures and the leaves are 3-D.  She used batiks for the backgrounds which simulate the land, the river, and the sky. 

The Tree is what I consider an 'art' quilt.  I've never done an art quilt and honestly working on an art quilt created by someone else sent a shiver of panic down my spine.  As I said, I'm a rule follower but 'art' doesn't have any rules!  

I began the project, as with all the other projects, by hanging it on my design wall and leaving it there for inspiration.  When we started the Round Robin we were each given a little note book that we used to describe why we chose our particular project and what we wanted it to be in the end.  So I took out Deb's book read the back-story.  

The gal that created this art work, Deb R., has been a lover of tree houses since she was a young girl.  In her note book she quoted the poem "Trees" by Joyce Kilmer.  I remembered studying that poem in English class in high school and it was a nice surprise to read it again. It starts out "I think that I shall never see a poem as lovely as a tree . . .".  

Deb went on to describe her first tree house and her wish to create one in the tree outside her new home.  She had been telling us her tree house plans at our monthly meetings so I had a hint of what she was planning.  She was going to enlist the help of her family and friends but intended to build it on her own as much as possible.  


I was the next to the last person to get The Tree.  Some of the others had put in some very creative additions.   

In the lower left Charlene had added Deb's two dogs.  

Carol added two kayakers on the river in their red kayaks.  

And Tami added an actual miniature quilt hanging on a clothes line with a basket of beaded flowers next to it. There's even a label on the back of the little tiny quilt!

This next picture shows the details of the batik border that Charlene added and the adorable turtle created by Carol.  You can also see some of the details in the tree trunk but you really need to see this one in person to appreciate the textures.


Next, in the far right right bottom corner just past the turtle and the ladder, you can see a big black bear added by Dutchy.  He's had enough of this craziness and is fleeing the scene!  There's also more of that beautiful woodland animals batik border.


As I surveyed the whole quilt it dawned on me that there were no people there to enjoy the tree house.  So for my additions I selected the "Fruit Bottom Ladies".  But I had to wait for the cat to finish his nap before I could cut anything.  


I picked 7 different women - one to represent each of the girls in the group - and added them to the quilt.  Since Deb has told us that this is a tree house for grown-ups I put two ladies sharing adult beverages on the deck.  Notice how the leaves are stitched?  There is fabric on both sides and doubled sided interfacing in between that makes them stand off from the surface.  It's just the coolest 3-D effect!  I couldn't capture it with my camera but it's just so fun.

Three other ladies are out on a limb watching the river and chit chatting away.  The white line over their head is the "phone" line for the two tin cans, one in the tree house, one in the garage, so the ladies can "call" for more refreshments. LOL


But there are two ladies missing.  Wait, I see them, down on the ground.  Hmmmm, could that be Deb trying to talk Tami up the ladder?  It's OK Tami, adult beverages can also be served under the tree house too ;o)


When I finished my additions I sent The Tree on to Jane.  She added a kite and some birds to the sky . . .


along with a cute 3-D tire swing!


I've probably forgotten a couple of items that got added but as you can see there's tons of stuff going on in this fun art quilt.  Each of us stretched beyond our initial apprehensions and came up with some pretty creative additions!

Deb loved the finished project and promised that when it was done it would be hung in the tree house for all visitors to see.


I thought I'd share this picture of the REAL tree house that Deb had posted on social media.  She is one happy woman with a real, grown-up tree house and a beautiful piece of art to hang on it's wall!


Next week is the final installment of the Round Robin and we'll look at Jane's project.

Tuesday, July 23, 2013

Never a Dull Moment

Last Friday was our once a month quilting group but I didn't make.  I was on a brief trip to California earlier in the week and needed to get back to East Coast Time.  So there are no quilting pictures to share today but I've got a few pictures from the storm that went through our area in the wee hours of the morning. 

Saturday morning I was enjoying a leisurely cup of coffee when I got a call from a friend of mine in Concord.  She and her husband were driving by my rental property and noticed a tree was down.  The storm had blown a branch out of the tree which landed on the garage roof.  I'm thinking OK, it's a branch, maybe a few shingles got damaged but I wasn't too concerned.  She asked if I wanted her to go check on it as there seemed to be no one at home.  So she did and sent me a couple of pictures.  That's when I knew I needed to get up there and take a few more.  My sister Dutchy joined me to check it out all out. 

Here's what it looked like from the road when I arrived.  Still not too bad but it did reach the truck that belongs to my tenants.

 
Then I walked around to the back to check the house which I knew wasn't hit but wanted to see for myself.  Here's what it looked like from across the yard.


The shed was OK and the house was fine but it's starting to look a little scary now . . . and as I round the corner of the garage here's the real damage.

 
=:-O   And just in case you can't see it here's a close up!


Now keep in mind that this tree is about 10 feet BEHIND the garage and the top of the branches were covering the truck in the driveway!


We're not sure but we think the truck is holding up the tip top of the tree and that's why it didn't crash all the way through.

So the good news is no one was home so no one was hurt.  I spent yesterday making calls. I've gotten in touch with the insurance company to file a claim and called 3 tree removal people for estimates.  I'm waiting to hear back from everyone this morning and of course it's pouring rain now so now the inside of the garage and the open walls and roof are all getting wet.  I knew I wanted to fix up the garage at some point but this was not the way I was planning to go about it!  But I am thankful that the brand new kitchen didn't get hit.

Anyway, it's hard to realize how big that tree is until you see this:

 
That's a trash barrel near the shed and this is just a LIMB off that tree.  It's BIGGER around than a trash barrel - OMG!  There are 3 more limbs the same size still on the tree which will have to come down to keep everyone safe.

So I'll keep you posted on the event that is my life but for now I'm going to take a shower and have another cup of coffee.

Monday, February 4, 2013

Finished Christmas Trees

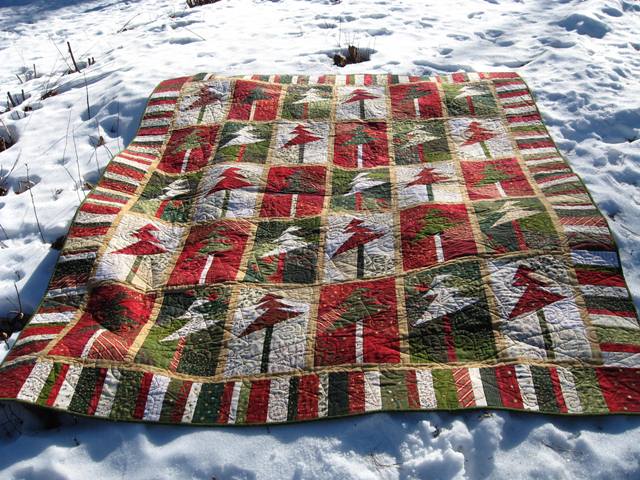
For someone who has all those projects piled up I'm not getting much done!  I did manage to finish the Whacked Christmas Trees so I'll share that with you today.  If you're interested in how it all came together you can see the process in the October 2012 archives.

The quilting on this came out just lovely.  It is done with red thread on the front and gold thread on the back. My picture taking skills are not as advanced as my quilting skills but I gave it my best shot.

The quilt pattern is actually Christmas Trees!  How original right?  I had planned in my head to have stars as the quilt pattern but during the "looking" process - that's where Lorri patiently scrolls through the tons of patterns she has on her computer while I look for the one that strikes my fancy.  We started out looking at stars but when this pattern of trees came up we both went - that's it!

If you look closely in the picture above you can see, at the top and bottom center of the picture, inside the white fabrics, two upside down trees.  The squiggle is part of the connecting lines.  It's always so exciting to see the finished product.

Here's a shot of the back - I manipulated the color in the photo to highlight the quilting so it looks kind of orange but it's really a beautiful Christmas red.  The trees look like they are dancing around having a party!  Lorri did a great job and as always it was fun collaborating with her on the quilting pattern, thread choices and even the binding color.  Thanks Lorri, that shade of green was the perfect choice.
 
 
Again, sorry for the poor pictures of the quilting but how's a girl supposed to get great pictures when the cat wants to be in the photo shoot?  (Besides the cat you can also see the green binding in this picture.)


That's Alice who jumped up on the sewing table while I was in the office downloading the pictures to the computer.  She has claimed this quilt as her own but I'm putting up a good fight, this one is for me.  It is currently laying over the back of my favorite recliner just waiting for me to take a nap ;-)  She's been poking her head up under it all the way to her shoulders.  I'm not sure what she's doing but I get the feeling she thinks we can't see her when her head is covered up !!!

I did manage to get a couple of nice pictures of the whole quilt outside.  This is in the snow on the hill next to the driveway.

 
Here's my favorite, hanging on the fence.  You can't see the top row of trees but isn't it pretty?  It was bitterly cold here in NH that day and the wind was blowing so I only got a couple of shots but the lighting was much better out doors.


And finally, a close up.


I hope all my friends in the snowy states are keeping warm and dry this winter!

As for that pile of other quilting project that's waiting for me I have actually started on a couple of them - Birdies, Bunnies, and a red-white-blue scrap quilt.  Did I mention I also went shopping for fabric?  Call me crazy but I'm looking for just the right shades of blue and cream for someone special.

I'll see if I can get the cat off the sewing table long enough to get some good pictures and write again soon.  Stay tuned.

Thursday, October 25, 2012

Whacked Trees: Row by Row

Slowly but surely I've been nibbling away at the Whacked Christmas Trees.  After all 30 blocks were constructed I laid them out on the design wall.  I took a step back and all I could see was one HOT MESS!  

You all know I'm not a fan of scrappy quilts yet when I did the wacky pumpkin quilt it turned out beautifully.  In fact it's one of my favorites!  I keep telling myself this one's going to be great too and I do love each and every fabric in it but boy I'm not in love with it yet.

The blocks by themselves are really cute.  Even side by side on these blue trays I use for organizing they seem to be fine together.  Hopefully, once I get the final border on I'll like it more.


In an attempt to give myself some order in the scrap heap on the wall I decided to add in some sashing.  I found this great fabric that I had used as a backing for Betty's quilt and as one of the blocks for Kim's quilt.  (The only one of The Girls quilts that's not been delivered yet!)

This fabric is a favorite of mine, from Joann's, because it's so versatile.  I mean really, what other fabric goes with cookies, camping, cats, birds, beer, and now Christmas trees!

Here's a peek at some of the Whacked Christmas tree blocks with their sashing.  I used a 1" sashing to go along with the skinny tree trunks.  It's kinda "growing" on me!


By the way, several of you have asked me about my story for Mary's quilt.  All I can say is I cried when I delivered it and I keep getting choked up when I try to write the story!   Here's Alice helping me put the binding on Mary's quilt.

 
Hang in there, I'll get it written soon I promise.

Thursday, October 18, 2012

Whacked Trees; the White Blocks

Work continues on the Whacked Christmas trees.  I've been calling them "Whacked" because the cutting method is similar to Stack and Whack but with a twist.  They also are wacky looking!

The blocks with the green backgrounds and the ones with the red backgrounds are all done.  The white backgrounds are next and I really love the prints and colors!  This has been a fun and interesting quilt to make.

For each block it was easy to do the tree trunks, there weren't that many pieces and I could see how they needed to be aligned to account for the 1/4" seams. The top of the trunk section in the picture below was trimmed to give a straight edge but it wasn't straight when I first pieced it.


Piecing the tree body was where the challenges started and continued! There's lots of angles which makes for lots of funky alignments. Before you can add on the next pieces you need to straighten up the edge your going to sew it on to. Can you see the uneven edge between the red tree top and the polka dot piece in the picture below? Once that was trimmed I sewed on the last triangle to finish the block.


By the time I got to the white blocks I had finally figured out that moving that top red tree piece over so that the center of the red triangle lined up with the point of the tree piece below it the tree looked "right". It's supposed to look like it's about to topple off.  As I made the adjustment to each of the white blocks I congratulated myself on how clever I was being!


Now to square them up. I measured the first one on the pile. It was just a liiiittle smaller than the green ones! Oh no not again! You guessed it, they were ALL just a little bit too small.  By shifting the pieces over I had moved the out edges making the width smaller.  I didn't catch on that it was happening when I did the green ones. When I made the additional adjustment to the white ones were all off even more then the green ones.

So I trimmed all the white ones to the smaller size, then I trimmed all the red ones (again), then I trimmed all the green ones (again)!  Finally, the blocks are all the same size. PHEW!

What would Dolly say?   Don't break your arm patting yourself on the back, you're going to need it to fix your mistakes!


Off to the sewing room to sew all 30 of those Whacky Christmas Trees together.

Friday, October 5, 2012

Stacked Christmas Trees

Here's a project I've been wanting to do for a very long time.  The pattern is "Tree's Up! Lights On!" from Pieces from my Heart.  I bought it in 2010 just after I finished my pumpkin quilt, which is done in the same stack and swap style.  

This is one of our favorite quilts for fall.  It's big and soft and warm!
I'm hoping the "Trees" will become our next favorite so I can give the pumpkins a rest!
 
This quilt takes 30 fat quarters so it's great for fat quarter bundles if you don't want to pick the individual fabrics.  I had lots of Christmas fat quarters that I had bought specifically for this quilt.  I also needed to pick though my stash for some additional pieces that I cut into fat quarters.  

I love that I'm working on a Christmas project and it's only October!

The last time I did this technique I was in a class with about 8 other ladies so it was hard to really understand what I was doing.  This time I made sure to read the directions a couple of times before I started.  I know most of you would just wing it but I LIKE reading the directions!  For those of you that don't like to read the directions here's how it goes.

Start by tracing the pattern onto the paper side of a piece of freezer paper.


Be sure to include all the letters and numbers - you're going to need them!  You have to cut in the exact order listed of the piece won't go together to make the trees.

Make 3 piles of 10 fat quarters each; greens, reds, and whites.  Press one of the freezer paper patterns onto each pile.  Now cut being certain to follow the numbers!


Keep the paper in place even after the pieces are cut.  Like most quilts keeping all the pieces organized is half the battle (or fun depending on how you look at it)!  Here are all the piles cut up.  The next few steps involves swapping out the colors.

Each stack starts as single color.
Swap the trees so that each background has a different color tree.
Now swap the trunks of the tress so that each tree has a different colored trunk.
That wasn't so bad now was it?  The next step is a bit more tricky but it's the one that gives you that scrappy look.  
Working with the background pieces only, start in one corner of the block
and take the top piece and move it to the bottom.
Move to the next piece on the same block and take the top
2 pieces and move them to the bottom.
Continue working your way around the tree and the trunk swapping out one additional top fabric and moving them to the bottom.  I have to say the directions were VERY clear, much better than what I'm writing here but I thought I'd give it a try so you can get a feel for the process.
 
Here's a close up of the red pile.  You can see that each of the background pieces is a different fabric.  The tree pieces are all the same but you could mix them up in the same way if you wanted.  I haven't decided if I want to do that or not.
 
This is the easiest technique I've found for doing "scrappy" blocks.
I think it has to do with the fact that once everything is cut up you can't move it to a different location only a different level.  And the limited number of pieces allows me to stay focused on the look of a single block with the object of having no two background pieces of the same fabric.
 
The weather's supposed to be getting chilly this weekend so I'm looking forward to spending time sewing. 
 
Hope you have a great weekend doing something fun!