Showing posts with label Dutchy. Show all posts

Sunday, October 12, 2014

Round Robin # 3 - Signature Wall Hanging

We had decided at our November meeting in 2013 that we would plan on doing the Round Robin starting in January of 2014.  By December my sister Dutchy was busy at work getting her first row ready.  She would be leaving for her annual trek to Florida just after Christmas but didn't want to miss out on our fun group project.

For her project Dutchy chose a signature block.  Her instructions said we could create a row using any block we wanted that represented something about ourselves.  In that row we were to add a signature block.

For her initial block she had done a beautiful job of embroidering her signature and birth date.  She then combined it with red and white nine patch blocks. Here's a close up.


Here's what it looked like by the time I received it.  Carol decided to leave off the year she was born and the rest of us followed suit.  And in the end Dutchy removed her 'year' too.


Carol added the Court House Steps block with 1" strips (finished).  I love the bold graphic look.  Tami added the pretty hand applique fans in 1930s fabrics.  Beautiful work done by both of them!

As the months go by in the Round Robin you can see that each time you get the next project bag there are more and more rows already in place.  Figuring out how to coordinate with the graphic pattern done by Carol and the light colors in Tami's blocks is part of the fun of a group project like this.  

Dutchy and I are sisters so there were many blocks that would have been appropriate to represent me to her.  Since sewing is one of the many interests we have shared over the years I thought the Spool block would be the best choice.  To create the spool block I started with several pretty pink fabric for the "thread" and a dark brown for the "spools".  


Putting the block together proved to be more challenging than I expected.  I didn't have a pattern so I just looked at some on the internet and improvised.  Once I figured out the appropriate size I laid out all the pieces.  I started with creating the angled edges of the spool.  


A little chain stitching meant it went together quickly but I had to pay attention to the direction of each white rectangles to make sure the angle was opposite on each end.  After they were all stitched I pressed them open, with the seam allowance pressed onto the dark fabric.


Here's a close up of all the parts of the block sewn together.


For the embroidery I used a stem stitch in #5 Perle Cotton.  I like the texture of the Perle for an outline stitch.  Its a bit thicker than regular cotton floss and stands up a bit higher on the project.  


And a little trick my mother taught me is to lay a bath towel on the ironing board then put the piece face down on the towel and press from the back.  I use plenty of starch to get a smooth surface which also makes the stitching stand out.

Here's how it looked when I passed it on to Jane.
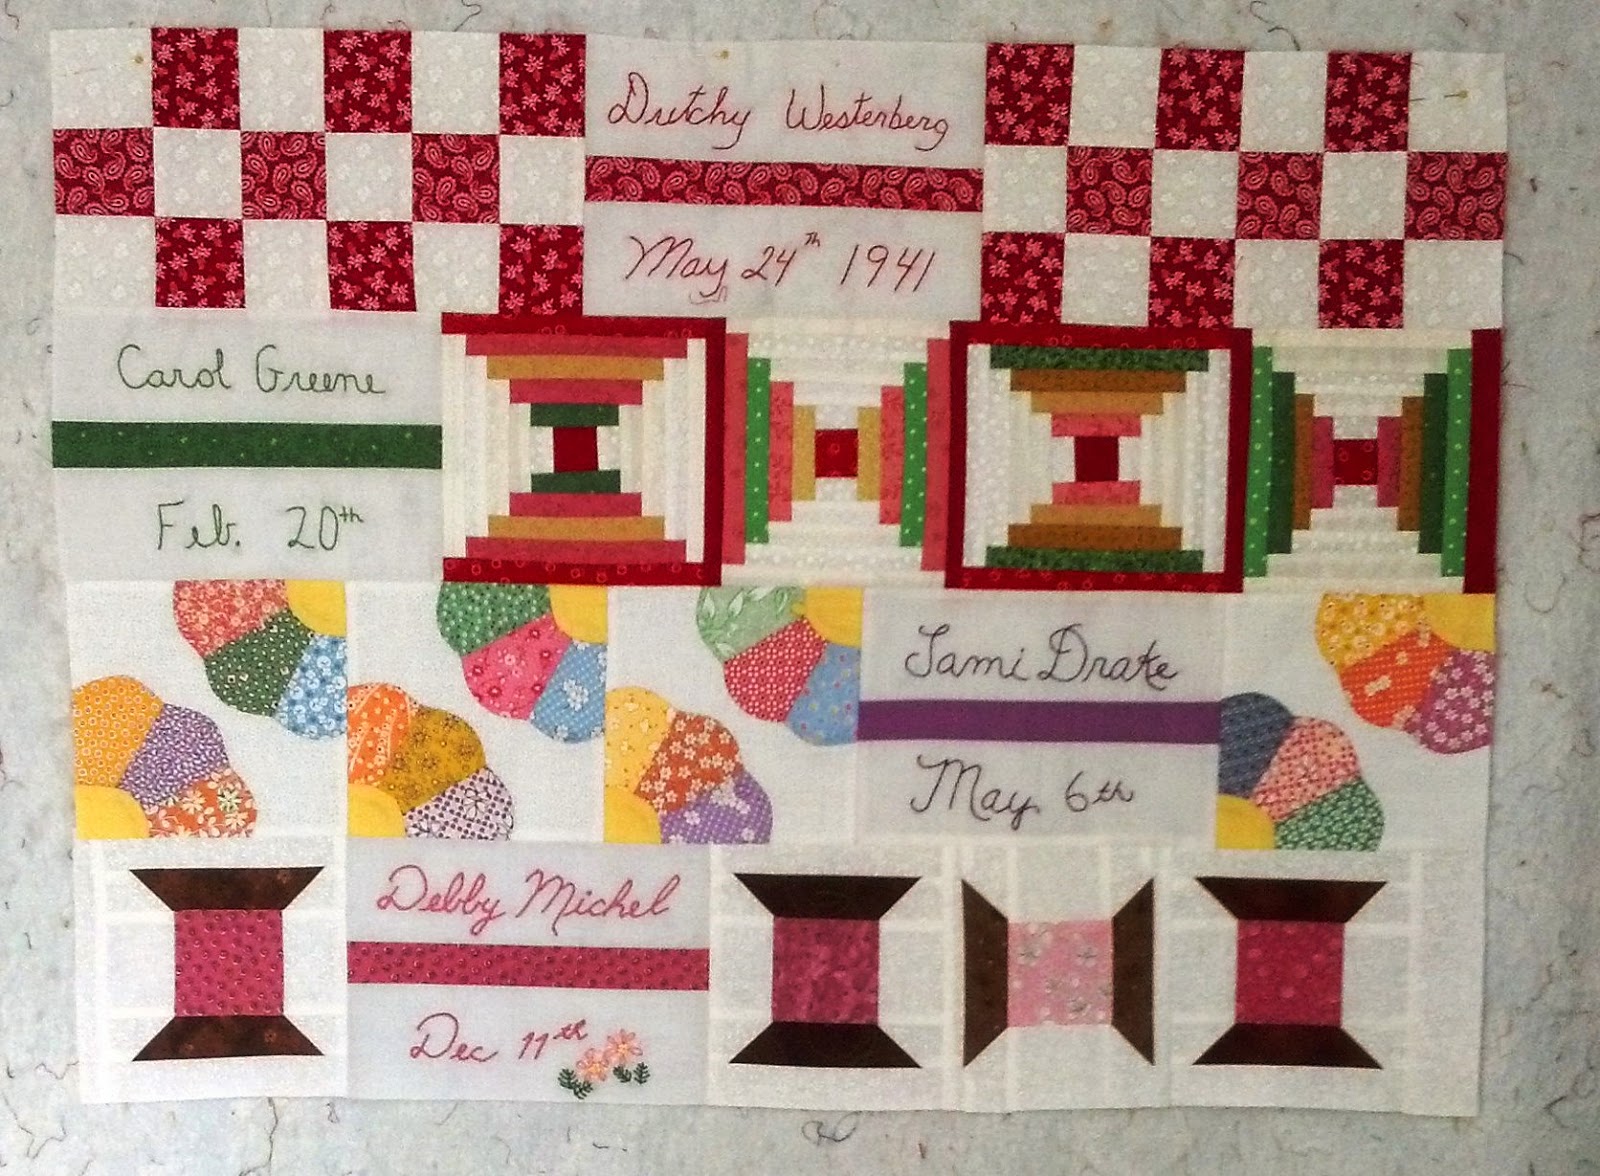


You can clearly see the piecing of the white background on the spools but that blend in once the finished piece is quilted.

And here's Dutchy the finished project.  It's the perfect size to fit on the rack she uses for wall hangings.  I can't wait to see it all done and hanging up next spring!


Next week, Round Robin #4 for Charlene.

Sunday, June 29, 2014

When You Don't Know What You Don't Know!


Most of you already know I started a new job back in March. (Yeah!  So happy and I love my new job!)  However, since then I have neglected posting but that doesn't mean I haven't been sewing and writing. So these next few posts will be catch ups, starting with the Hunter Star.

There was a long wait between landing the job and actually starting so I decided to tackle some UFOs that have been sitting around for a while.  This one is the Hunter's Star.  I started it in 2004 while at a quilting retreat at Threads Galore in Rangely, Maine.  It was a beautiful long weekend in the fall and the teacher was Deb Tucker

When I went to my first quilting class in 2000 I had no idea what I was getting myself into or how much fun I would have quilting.  By the time my sister Dutchy and I headed to the back woods of Maine four years later I was feeling pretty confident in my skills and ready to learn something new.  What I didn't know was that this project would take years to finish.

Here's a picture of the view from the lodge deck in Rangely.  This is what we were seeing as we sewed on the enclosed porch and had our meals in the dining room.  Just lovely!


Back to the quilting.  The quilt it self was a challenge for me because it required using templates.  This was done with an early version of the Rapid Fire Hunter's Star ruler that Deb Tucker invented.  We got a skinny ruler that we used to cut the strips but the new ruler looks much easier.  So here's what happens when you don't know what you don't know.

If you're like me you jump right in - buying pretty fabric, cutting out the pieces, learning the new technique, and sewing some blocks.  I have to tell you this "jumping right in" technique has resulted in more than one pot-holder from fabric that was going to be a bed sized quilt!  I call it building my stash ;o)

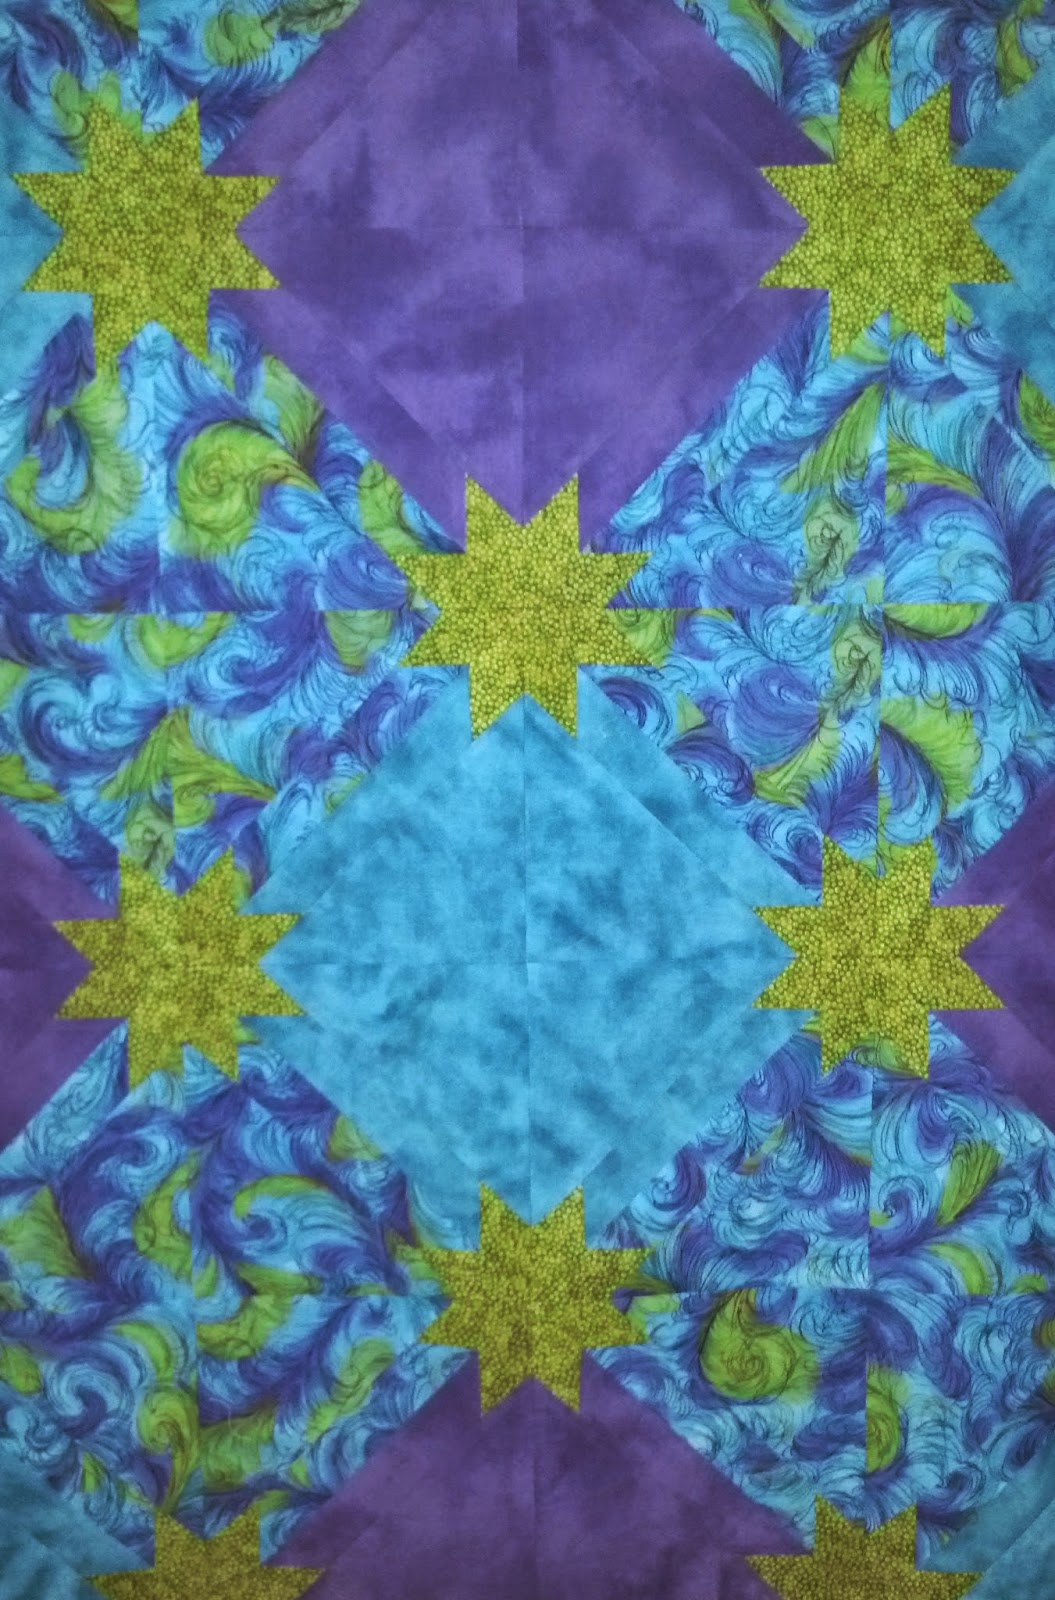
I had chosen this beautiful "feather" fabric as my inspiration for the colors in this quilt.  I was still pretty new at picking colors but I chose three coordinating fabrics with what I considered enough contrast to make the "stars" pop.  It's hard to tell in the picture but the colors are a light turquoise blue, deep purple, and lime green.  Sounds ugly but in person it's really beautiful.


I chose the green as the color for the stars but of course there are no stars in the actual blocks.  They start out as triangles like you see in the picture below.  It's not until you put them all together that you see the stars.  What I didn't know was the green of the stars would blend in with the green of the feather fabric and not be enough contract with the purple so that the star points got lost.  It was fine as I was building the blocks but you'll see what I mean in some of the finished pictures.


Notice the white looking edges on the solid blue triangles?  That's from washing.  This project had been stored in a box in my basement and it got wet when I moved.  By the time I found it there was a musty smell to all the pieces.  I had paid a lot of money for the fabrics and really loved them so I decided the best thing to do was wash all the pieces.  What I didn't know was washing and drying them would cause all of the cut edges to fray!  Oh yeah, and I didn't know that every single one of those green strips, blue, purple, and feather triangles would come out of the dryer looking like so much spaghetti!  What was I thinking?

After lots and lots of ironing, with plenty of spray starch, I finally got all the pieces to lay flat.  I was really worried about the triangles because of the bias edges but the starch helped tremendously in keeping them straight.  After all that I couldn't remember what the layout was supposed to be so I set the pieces aside again for another year or so.


As the years passed I would take the project out to give it another shot.  Somehow I couldn't seem to finish it.  I loved the colors but something didn't work and I couldn't put my finger on it.  So back into the drawer it would go.  When January rolled around this year I found myself home without a job and plenty of time on my hands.  Between writing resumes, cover letters, and job searching I decided that I would have plenty of time to finish up some of the old projects that were sitting around.  This one was on the top of that list!

When I took it out this time I was surprised to find that I had lots of the triangle blocks completed.  I tried to lay them out but couldn't remember exactly how it went.  Thank heavens for the internet!  I was able to search for images of the Hunter's Star quilt and see what was needed.  What I didn't know was that some of the blocks were sewn together wrong so no matter how I arranged them on the design board I just couldn't make it look right.


But I was determined to FINISH THIS PROJECT!  So I forged ahead. First I trimmed all the long edges of the triangles so that they each strip was the same width.  It didn't take much effort but measuring was important so I took my time.  Next I finished sewing all the triangles into blocks being careful not to stretch the edges - again, starch saved the day.

Now if you looked closely at the blocks you'll see that I had sewn a feathered triangle to a feathered strip with green tips. I also sewed a solid triangle to a solid strip with green strips.  Pretty!  I was so happy that it was finally all coming together.


But wait, something didn't seem right with this batch below . . . there should be a plain side and a feather side to the block.  Get out the seam ripper.  It was a pain in the neck but finally I got all the blocks made.  Still . . . something wasn't quite right but I couldn't put my finger on it.   


What I didn't know was I should have alternated the colors of the points on the trapezoid pieces so that it could have looked like this, see how the "star points" are different?  This picture is from my sister's beautiful quilt which I'll show at the end.  Her stars have alternating colors and it is just gorgeous!


Anyway, with all the blocks made I could square them up.  Finally, I was spiraling in on the finish.  I used the 8" square ruler and the 12" rotating mat.  What a quick way to get the job done.


I laid the blocks out on the design board and left it up for a few days to see if I still liked it.  As usual I moved the blocks around over the course of about a week until I finally got one I could live with.  I have to tell you I didn't much like it now matter how I moved the blocks.  After looking at it to the point of irritation I finally said enough already and just sewed the damn blocks together.  

I auditioned a couple of options for the borders and settled on this one.  I didn't have enough of any of the original fabrics so I used the purple, (which was what a I had to most of) and put portions of the left over blocks in as corner stones.


Here's what it looked like during the class in Maine.  That's Deb Tucker on the left helping me lay out my blocks while Dutchy keeps a close watch over us.


And here's Dutchy's layout, isn't it just beautiful?!  


And here's how my Hunter Star turned out.


In the end, this multi-year project, with all it's starts and stops is finally a finished top.  What I didn't know was, after all that, I would truly hate it!!!!!!!!!!!!!  I've often heard the expression there's no such thing as an ugly quilt but I have to disagree.  This quilt is ugly!  So it has been relegated to the Finished Tops pile and will remain unfinished until I'm ready to try my had at machine quilting on my home machine.  I doubt I will ever feel it is worthy of the money it would take to have it quilted by someone else.

However, I do think it is "cat worthy" and it may yet end up as a finished quilt assigned to keep the cats happy HaHa!

Tuesday, October 1, 2013

Hair Options

Our Once-A-Month Quilt Group enjoyed a lovely fall evening at Jane's last month.  The weather was beautiful, no rain!  That's an inside joke. You see the gatherings at Jane's usually come in the spring and the fall when the weather is rainy and cold.  But this time we were lucky, the weather held out. 

I forgot to take pictures of the show and tells but I did get a few close-ups of Deb's "People" quilt.  Dutchy is making one for herself and is working on the hair.  There's lots of little people on this quilt and she's running out of hair options!

These are a few of the hairstyles on Deb's quilt.  Pig tails, curls, braids . . .
 
Short and long . . .

 
and one poor little girl (in red) with her face sewn to the shoulder of her dress!  Deb says she must have been really tired and nodded off but didn't notice at the time.  Then when she went back to do the hair she realized what had happened.  We say there may have been adult beverages involved ;o) 
 
 
Either way, her hair is FABULOUS!  Deb's leaving it just the way it is.  I think she looks like she's dancing.  It's just one more fun thing to see in the quilt. 
 

Three of the girls each made this fun little quilt and displayed it at the Capital Quilters Guild Quilt Show in 2009.  Deb and Carol each made two sets of the nine patches then swapped with each other to get a great mix of blocks. 

Deb, Dutchy, and Carol with their "People" quilts
(2009 Capital Quilters Guild Quilt Show)

If you take a look at the corners you can see that Dutchy made her outside borders square while the other girls made theirs angled.  Both options came out really nice. I love the repeat of the red fabric used on the inner border on the binding.


This was no quick project that's for sure!  Each of the little people has a different outfit on and different hair style.  The people and their cloths are all fusible applique. The hair styles are done with embroidery floss and/or yarn.  Here's a close up of Dutchy's.  This beautiful quilt was a gift that she gave to the Rector and his wife at St. Paul's School (where she worked) to remind them of their world travels.  They absolutely loved it. 


So after giving the quilt away as a gift the group of girls at the local quilt shop got together and gave Dutchy some beautiful fabrics so she could make a second quilt for herself.  It's still a work in process and she's finishing up the hair.

I hope she uses this one again it's my favorite!


Hope you're inspired to make your own "People" quilt.

Friday, April 26, 2013

Monthly Quilt Group

Has it really been that long since I posted something?  Yes!  According to my Monthly Quilt Group it's been just forever.  Needless to say they were laying the guilt on pretty thick at our last get together.  All in good fun of course ;-)
 
Not that I haven't been busy with several projects its just that two of them I can't write about yet and the other two are still at the same stage as the last time I wrote about them.  So I've got some fun show and tell shots of the project that each of the Group members are working on - except the other Deb, for some reason I didn't get any pictures of her project.
 
Here are the rest of the gals with their quilts.  First up is Jane and the Houses BOM quilt.  I love the secondary pattern created by the two toned Courthouse Steps blocks.
 
 
Here's a close up of it.
 
 
Next is Carol.  She's been working on these beautiful applique blocks for quite a while now.  It looks wonderful all put together.  The black background is so striking! 
 
 
Here's a closeup of Carol's wall hanging. Those flower colors are just popping off that black.
 
 
Here's my sister Dutchy just back from her annual trip to Florida.  This snowbird was busy while she was down there for 3 months.  Golfing, swimming, and even teaching a quilting class!  She has promised to share her pictures of the quilt that her quilting class made and raffled off.  When I get them I'll be writing a post to share with everyone.
 
 
Her project is hexagons.  She's making a table runner to go in her kitchen.  I didn't get a clear picture but you can see how she fussy cut those fun chickens She'll have 3 of these hexagon chicken blocks on a beige background for the full table runner.
 
 
This is Tami and her Wonky Churn Dash quilt.  This was a class at the local quilt shop taught by Charlene, one of the other gals in our little group.  Wish I had been able to make it for this class.  Great colors! 
  
 
And she added that fun applique border. She's a whiz at applique, not just fast, her hand work is also beautiful.
 
 
 In addition to the churn dash quilt, Tami also had this cute applique wall hanging.

 
Here's a close up.  I just love those fun flowers, so pretty!


No pictures of Charlene this time, she was off to Maine to visit family. I'll catch her next month. 
 
And even though I didn't get any pictures of the other Deb's project I can tell you it is a beautiful full/queen size quilt that she is hand quilting. The blocks are hand embroidered flowers of each of the 50 states that her grandmother started. Deb is putting the finishing touches on it with beautiful floral sashing and cross-hatched hand quilting. It is just beautiful. I'm pretty sure our next get together is at her home so I will definitely take some photos of it.
 
Oh yeah, and no pictures of me this time because the project I was working on is a gift.  Besides, my face was so red in the pictures it looked like I'd been out in the sun too long.  LOL
 
A big THANK YOU to Jane for hosting this month. Jane's turn is always in April and it's always raining but this time, just for the record, NO RAIN!!!
 
See you girls next month and I promise to catch up on my blogging :o)
 

Wednesday, September 19, 2012

Travels, Aprons, and a Quilt


Summer 2012 is finally winding down.  "Finally"?  Did I really say that?  Yes!  It's been a busy few months for me and I'm glad to say I've been home a couple of weekends doing some sewing.  Since the beginning of June I've been to San Francisco (work), Boise (Mary), Orlando (more work), San Diego/Los Angeles (adventure!) and topped it all off with a trip to Maine (vacation).  All these trips were fun and tiring!  After returning from vacation in Maine it has taken me a week to catch up on laundry, e-mail, housework, and oh yeah, my job.  

Now that I've gotten back into my regular routine and "semi" back to my diet ;o) I'm ready to add sewing to the list of things to do.  So before I get to work on the pictures for the post on Mary's quilt I decided I needed to do a little sewing to get back in the grove. 


Tea Towel Apron

To get my creative juices flowing again I started a new project.  We had a bridal shower last weekend that we needed to make 4 aprons for.  "We" (that would be me and my sister Dutchy) had planned to get together and make these aprons over the summer. 

We are both experienced seamstresses and accomplished quilt makers but, as they say, timing is everything.  You can see from all my travels listed above I wasn't available much plus I still work full time.  Which is only half of the equation because Dutchy is retired and as far from sitting home in her rocker as you can get. 

Needless to say it was getting down to the wire and although we had started to make one apron the whole project just wasn't going well. There were too many parts to the apron and the colors weren't right.  So I went searching on the Internet and found the cutest apron pattern tutorial on Missouri Star Quilt Company site. 

It's an apron made from a single tea towel and a little bit of fabric.  It has an adjustable strap and can easily fit any size from adults to kids. I just love the way the strap is one long piece of binding and it slides through the sides of the apron to the top and back down the other side. 


I showed a sample to my sister and she loved it too.  Now she wants to show her craft group how to make them.  I hope you like it as much as I do!  The video is two short (less than 3 minutes each) tutorials and she give you all the dimensions.


I tried using some fabric from my sister's stash but the main color theme for the shower was purple and this fabric was orange, yellow, and green!  They are fun fabrics for a kitchen but not for this shower.  I finally figure out that there wasn't enough contrast between the apron fabric and the pocket fabric.  It looked OK but not WOW. 


Since I didn't have any tea towels with purple in them (that was the theme color for the shower) I went in search of fabric and found this swirly one. 

 
And this beige one.


I made the "tea towel" ones for the brides maids and they came out really cute but I didn't get any good pictures of them!!  Here's one of the bride's maids wearing one but it's pretty blurry.  Anyway, can you believe that's the size of a tea towel?  She's an average size woman and it fits her fine.


Here's the top of Heather's apron.  Hers was more detailed with beige binding and white rickrack.  I love how it turned out but it was kind of big when she put it on at the shower so she didn't wear it.


But the real star of the shower was the quilt that Dutchy made for Heather for the wedding.  It was a big hit with Heather and the crowd too.  Beautiful work Dutchy!!  The pattern is "Apple Blossoms" and it is gorgeous!


Heather and her Nana Dutchy with the
quilt Dutchy made for the happy couple.
After taking pictures all day long at the shower I was so disappointed to find that most of them were blurry and can't be used.  This one of the quilt was one of 3 that came out good.  I've been struggling along with my camera held together with duct tape for a while now.  I guess I'll just have to go get a new one.  That sounds like a plan!