Tuesday, December 20, 2011

Snowball Baby Quilt

I got started on the snowball baby quilt over the weekend.  With Christmas just around the corner there isn't much quilting happening.  Like most folks I'm finishing up work assignments along with holiday baking and shopping.  Here's what I've got so far.

Some fun faries!


Some yummy "goes with" fabrics.


A cute pattern. 


And my first few snowballs.


The individual snowballs are 5" squares with 2" squares on the corners.  I'm stil playing with the arrangement since as usual I'm putting my own spin on that cute pattern.

Speaking of that pattern I had the reference wrong on the previous blog entry.  The pattern is "Tea Party" by Alison Newnam and Kaitlin Witte as shown in June/July 2011 addition of "The Quilter Magazne".

I had an intersting chat with my friend at Minka's Studio about storing fabric.  We both agreed it would be a good post so that will show up here and/or there sometime soon!

Merry Christmas and Happy Holidays to everyone!

Friday, December 16, 2011

Chocolate Pillow Covers

I had just two blocks left after making the Box of Chocolates quilt top.  These are actually the original two blocks I made when I was trying out the colors with the pattern.


  I couldn't let them go to waste and didn't want to have to store them so I decided to make pillow covers.  To match the quilt I added two borders.  First a 1 3/4" strip of cream, then a 4" strip of the chocolate brown.


You can kind of see in the picture that the cream borders are a different shade from the cream I used in the block.  I actually dug up the original cream fabric and planned to use that but ended up cutting the cream I used in the quilt instead.  Once I had cut the strips I figured it would help to make them look more like they belonged together with each other and the quilt so I just went with it.

I think they came out pretty nice.  I'm going to bring them with me to the long arm quilter when I bring the top and see if she can do the same kind of quilting on all three pieces.  If not then I may just use them to try hand quilting for the first time. 

Now I'm ready to start the next project.  I should be working on the last two quilts for The Girls but the fabric hasn't arrived yet so I've got something else up my sleeve.  My sister was looking for a pattern for a baby quilt.  I came across this one in one of the latest issues of Fons & Porter's Love of Quilting.  


It's snowballs and nine patches.  I just love the colors. I rummaged around in my stash and found all the fabrics I need so I've decided to see if I can make as a sample to show her! 

Stay tuned for more on the baby quilt . . . mine and Dutchy's.

Monday, December 12, 2011

Box of Chocolate - Borders

Just a quick post to finish up the Box of Chocolates.  Several attempts at adding borders brought me to this final warm chocolate brown around the outside.  I tried it with a 2 inch inner border of the candy fabric but it it was too busy.  So I ripped that out and settled on this one.  I saved the 2 1/2 inch strip of the candy fabric so I can use it as a binding.


Tomorrow I'll be calling the quilter to schedule an appointment.  She's booking into January now because of the Holidays so this one will be on the back burner again until next year.

It feels good to have completed an entire quilt top in just 3 days even if I did have a head start with the star blocks all done!

Sunday, December 11, 2011

Box Of Chocolates

I had promised myself that since my birthday was on Sunday this year I was going to give myself the weekend off.  No housework, no laundry, no yard work, no shopping, no cooking - well, OK, I don't cook much any more but still I do occasionally make a meal.  But not this weekend.  Instead I planned to spend the entire weekend quilting.

Working on the quilts for "The Girls" has left me with several projects that didn't work out for one reason or another. 

Fortunately, I like all of them enough to finish for myself just not as gifts.  This one is the Box Of Chocolates.  Doesn't this fabric look yummy enough to eat?

I know spending your birthday quilting probably doesn't sound like much fun to you non-quilters but think about it.  If you have a hobby don't you always wish there was more time to just enjoy your hobby instead of trying to squeeze in a hour or two between the daily/weekly chores?  My mother of course is looking down from heaven with that look she had which said "you can't have any fun until the work is done".  Well not this weekend Mom!


I stepped into my sewing room immediately after work on Friday and have been happily sewing away ever since.  Initially I thought I would be working on one of the quilts for "The Girls" but then I realized I was waiting for some fabric to arrive from Keepsake.  That put a different light on things.

I'm sure you can relate to the stack of project in various stages of un-done.  Here's a look at the bookcase that's behind me when I'm sewing.  Naturally, I can't see it when I'm sewing so I kind of forget about it until I turn around.


Between the top of the bookcase and the bottom of the white shelf I've been tucking piles of fabrics that won't fit into the bureaus or closet where I keep my stash.  There are several works in progress just waiting for my attention.  That's where I found the Box Of Chocolates. 

I use these cool blue trays that come from one of the gals in a quilting class.  I'm not sure where she got them but they work really well for storing bits and pieces of projects in process.  And they slide neatly into that space on top of the bookcase!


I pulled out the tray with the Box of Chocolates and here's what I found.  Some pieces that were left over from the last time I had worked on the project, the instructions, and 8 finished blocks.


I pinned 6 of the blocks to the design wall as shown in the pattern.  Aren't they pretty!


The two remaining blocks had a different background fabric which I remember thinking was too white when I started but seems fine to me now.  What was I thinking?  Oh well, water over the damn. 


The pattern by the way is by Jennifer Chiaverini from the Elm Creek Quilts: Joanna's Collection which you can find here at Red Rooster Fabrics.  If you're thinking of making it be prepared for lots of cutting and lots of small pieces.  There are also 4 different borders that go around the outside.


When I started working on the project again Saturday morning I remembered it was the pinwheels that had stopped me.  I really like the pinwheels but I remember thinking at the time that there were so many half square triangles in the first block I didn't want to deal with pinwheels in the second block.  Now that some time has passed it doesn't seem like that big of a deal to make pinwheels but I really just wanted to finish this up.  So I decided to put the candy fabric in the center instead of the pinwheels.


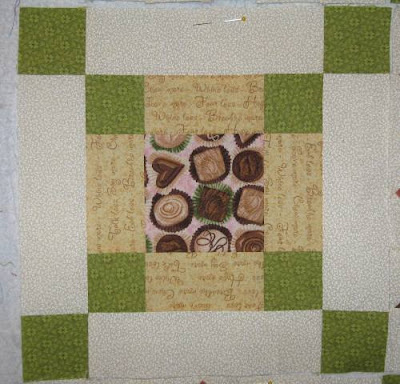
Here's the block pieces all laid out and ready to sew.  I had planned to use strip sets instead of individually piecing all the squares and triangles but I had about half of the pieces already cut so I just went with it. 


The piecing went quickly until I ran out of bobbin thread.  I stopped long enough to fill up a bunch of bobbins.  Guppy was fascinated!  Apparently he's not been around to witness this spell binding event before.


With a dozen bobbins filled up the sewing and pressing went along smoothly.  Before I knew it I finished all six of the blocks and it was time to head of to bed.  Here's the finished block.


The yellow fabric has some words of wisdom that I really liked:
      Breathe more ~ Talk less ~ 
            Say more ~ Whine less ~
                 Love more ~ Fear less ~
                     Chew more ~ Eat less ~
                         Hope more ~ Breathe more


As I took a break from sewing to write this blog entry I found I was not alone.  Unlike her brother, Alice is not much interested in sewing but she can't seem to endure any attention paid to the computer when she is in need of some love and attention, which is always!  So she parks herself on my "mouse" arm until I'm forced to give her all the affection she needs.


All in all it's been a very productive weekend.  Here's the finished blocks all assembled and ready for borders.  There's still plenty of day light so I'm planning to get the borders on and have a completely finished quilt top tonight.


Right now I'm hearing the dinner bell so it's time to enjoy a special birthday dinner with the chef before heading back to the sewing room. 

Hope you have a much fun on your birthday as I'm having on mine! 

Saturday, December 3, 2011

Getting A Little Help

Working with the bright colors for this latest project - Black, White and Brights - has really taken me out of my color comfort zone.  After making my color choices I usually like to make a sample block or two to get a feel for the techniques I'll be using and the color combinations in the finished blocks.  That's exactly what I did last weekend but the results left me less than thrilled.

Let's start with a single block.  It's easy to make and looks great.  I got the pattern from the Missouri Star Quilt Company tutorial.  It's called X's and O's and you get a bonus quilt call the "Serendipity Quilt", more on that when the first one is finished!.


Then I tried some setting combinations.  First was alternating the black and white like this.  I even tried to add in a green triangle - you never know . . . But none of this was working for me.  And the harder I tried the worse it seemed to get.


There were also several variation in between but I was so focused on the design wall that I forgot to take pictures!  Anyway, none of them were working for me either.  Eventually, I just gave up and went to bed thinking usually the light of day makes things clearer.  Unfortunately, that didn't happen in this case. 

In the morning I stood at the design wall again and just couldn't get to liking it.  I was leaving for a business trip in a couple of days so I had a lot on my mind.  I decided that's what the problem was, I just couldn't appreciate what I was doing with so much else on my mind.  As it happened my business trip was just an hours drive away and once the meeting was over I'd have time to take a side trip to a local quilt shop on my way home.  So as I was packing for my trip I pulled all the parts and pieces off the wall and stuffed them in my suitcase.

After a successful meeting with the client I looked up directions to Bits and Pieces in Pelham NH.  I'd been there once before but was coming in from a different direction.  I remember thinking on that first visit that this would be a place I'd definitely have to come back to.  They have a wide selection of quilting fabrics and large bright, work room off to one side. 


When I arrived I found three ladies in the work room taking a break for lunch.  I placed my pile of pieces on the table and asked for help.  They invited me to sit down and talk it over.  We talked about colors and settings and all the other things that you think about when making a quilt for someone.  What kind of colors does the person like; what colors do I like to work with; what will the quilt be used for - wall hanging, cuddling, picnics.  As we talked I laid out the pieces so they could see what I had been doing.  We moved the pieces around, flipped them back and forth, tried different combinations and in the end came up with this layout:


The center makes a pinwheel, the colors make an X and the groups of blacks and whites make the O's.  Somehow seeing it there on the table and having other quilters to talk it over with made all the difference in the world.  I had made the right choices for colors after all and there are multiple variations on the layout that I can do.  One piece of advice I'll be taking is to make all the blocks first then pick the setting.

Maryjane, Carol, and Robin were very helpful indeed!  Thanks so much to the three of you for making me see that working outside my color comfort zone may be a challenge but the end result will be worth it.  A special thanks to Maryjane for snapping the picture and sending to me. 

I hope they'll all stop by here to see the progress and cheer me on.  Thanks for the help ladies! 

Anyone else got any suggestions about working outside my color comfort zone?

Monday, November 28, 2011

Black, White and Brights

With Blue and Cream off to be quilted I took advantage of the long holiday weekend to start on a new project.  Black, White and Brights is starting out great.  I saw this tutorial on YouTube from the Missouri Star Quilt Company site (Love MSQC tuts!!!).  The pattern is X's and O's or Hugs and Kisses.  I haven't been able to find a pattern on-line other than this tutorial so you'll have to wait for the finished project to see the whole thing.

Now that I have a pattern in mind, which by the way, took me about 2 months to decide on, I start doing color auditions. .Here's how I generally start out with color auditions.  First I decide which fabric is the central character, in this case I'm trying to decide if I can work in two different prints that have similar colors.


Running shoes and


Bras! 


I pin them on the design wall then rifle through my stash to pull out coordinating colors/prints.  Some of these I purchased at the same time as the prints so I knew they coordinated and I knew where to find them among the stash.


Since I'm using my stash there is always the possibility I'll find the perfect color only to find out it's less than a fat quarter which makes me kind of nutty.  Why didn't I buy a whole bunch of it when I was shopping?  This is where I start to get creative.  I pulled more pieces of the same color selections and try them out on the sewing table.


This is supposed to be a "scrappy" quilt.  Back when people were making quilts out of necessity they often used bits and pieces of fabric from scraps of old clothes or other sewing projects.  I've never been particularly fond of these types of quilts and prefer to have "organized" scrappy quilts.  Fortunately, I'm not living out of a Conestoga wagon or a sod house on the open prairie or waiting for a ship to arrive from Europe with a bolt of fabric.  If I don't find what I'm looking for in my medium size stash of fabrics here at home I can just run down to the local quilt shop or nearest Joanne's to get what I need.


Before I sew anything I give the pattern a try out with the colors I've chosen like this:


And that's where I left off at the end of the day yesterday.  So tonight I might actually get something sewn together!  Stay tuned, there will be more coming up this week.


Friday, November 11, 2011

Thank You Notes

I haven't mentioned it before but one of the up sides to giving quilts as gifts is getting snail-mail.  I love hearing about and seeing the quilts in action!

Betty sent a thank you note the other day in which she reports she's using her quilt and "it's been comfy cozy".

I also received a very nice thank you note from Trevor's mom (a.k.a. Amanda) with this cute picture of Trevor and his quilt.  Just adorable!


In this day and age of technology, where e-mail notes are a perfectly acceptable form of thanking someone, it's nice to know that the hand written thank you note is still alive and well among my family and friends.

Enjoy!

Tuesday, November 1, 2011

Happy {Very Belated!} Birthday

What's more fun than making a quilt?  Surprising a friend! 

With schedules being what they are we haven't had a chance to get all The Girls together so I couldn't deliver the quilts I made for Betty and Audrey.  Last Friday we thought we had a quorum so I brought the quilts to Jean's to surprise the birthday girls.  As luck would have it Audrey had to cancel at the last minute but Betty was there so she received her VERY belated birthday quilt.

"It smells so good!"
Jeannie's behind the quilt holding it up so Betty can get a better look.
 
Oh look!  A tent! Some beers! OSJ!
Here's a close up of what's she's looking at.  For those of you readers that are quilters the pattern is Disappearing 9-Patch.  The fabrics are cats, cookies, camping and beer, 4 of Betty's favorite things.


The quilting is dragon flies buzzing all over the quilt.  It's done in an orange colored thread which really pops on the black borders as well as the cream background fabric.  A big thank you to Lorri Wurtzler of Nashua for doing the long-arm quilting.  She really brought my idea for "some kind of bugs" to life!


The binding is a black and gold print that made a pretty pattern when folded and sewn into place.
 
It was so fun finishing this quilt with all those dragon flies buzzing around!
Finished binding
Now back to the birthday girl.  Betty always makes chocolate chip cookies for The Girls when we get together.  She has the fun container that has a big cookie for a lid!  Sure enough when she arrived she had a container full of warm "chippers" for us..

Chippers!

Happy Birthday Betty!


PS Audrey's next . . .

Friday, October 28, 2011

Crazy Eights for Audrey

Audrey loves the sunshine! Audrey's birthday is in August but her quilt has been done for quite some time now.  In fact hers was the first quilt I made in this project of the birthday quilts for "The Girls".

Living in the Northeastern US means we get only 3 months a year when the weather is considered mild enough to go to the beach in a bathing suit.  We actually have four seasons; almost winter, winter, still winter, and road construction!  This is a challenge for a sun worshiper such as Audrey.  I remember that she would be the first one to don a bathing suit and slather on the baby oil (yes baby oil!) in hopes of soaking in the first rays of sun in the spring (that's "still winter" for you non-NH folks).  She would also be the one on the ski lift with her face pointed upward to catch a bit of the winter sun during a day on the slopes.

When I started the birthday quilt project I didn't have any idea that I would be blogging about them.  Fortunately, I took pictures as I went along thinking I would add to my scrapbook for all my quilts.  Now that I've figured out how easy it is to blog, I don't know if I'll ever get them into that scrapbook.

I first came up with this combination of fabrics based off the fish print seen in the photo on the left.  It was cute but somehow didn't say Audrey to me.  I thought it looked rather childish and while Audrey is a fun person she is certainly not a child.

It had potential but I decided to keep looking.  This combo is tucked away in the "ideas" folder.

During the inspiration phase of Audrey's quilt I had to go on a business trip to the west coast.  Luckily, I was able to combine my return flight with a stop over in Boise ID to visit Mary.  Ever the gracious hostess, Mary had planned several activities for us to do while I was there.  The main one was a "float" down the Boise river.  A story for another time but it was an adventure I will never forget!

The day after our adventures on the river I asked Mary if she could take me to a local quilt shop.  That's where I found this perfect, vibrant, sunny, floral fabric for Audrey’s quilt.  It was the inspiration for the color choices along with the last fat quarter of this deep pink they had in the store.


With the main fabric selected I brainstormed with my sister on which pattern to use.  (You'll probably notice throughout my posts that I regularly use my sister as a sounding board for my quilting projects!)  She had recently finished a summer wall hanging with a beach theme that included appliques of a pail, bathing suits, flip flops, umbrella, etc.  I wanted something that would work on the beach as a blanket for sunbathing so too much applique wouldn't do.  And anything too traditional wouldn't reflect Audrey's sunny side.  Luckily Dutchy had also just finished a baby quilt using the Crazy Eights Pattern.  I decided to try combining elements of both the crazy eights block and applique blocks to create a fun quilt for Audrey. 

Here's the audition for the rest of the fabrics which all came from my stash.  Every time I walked into my sewing room and saw these colors they made me smile.  Let's hope they do the same for Audrey.

Once I had decided on the final fabrics I chose a white background to use for the applique pieces.  This was my first attempt at hand applique so I also chose large patterns.  More on that further down.

Cutting and sewing the blocks was a breeze. The colors were such fun to work with.  Unfortunately, I don't have any pictures of that part of the process but by the magic of digital photographs I was able to crop out a
single block to show you. 

Notice it only has 6 pieces.  The pattern name comes from the fact that you use 8 fat quarters to make the whole quilt.  I know, I was confused at first too.  Basically, using the 8 colors gives you more options than just using 6 fat quarters and 6 squares. 

In general, the idea behind the Crazy 8 pattern is that by rotating the completed blocks you come up with a scrappy look that appears to not be blocks at all.  This is where my design wall was a huge help.  I left the blocks on the wall for a couple of weeks and kept rearranging them whenever I went in for another look.  I'll bet I would still be able to give one or two of them another twist if they were still there today. 


Finally, I settled on an arrangement I liked and sewed them together before I changed my mind again!  Here's a peek at the center of the finished quilt.

So bright and cheery - just like Audrey!
 The applique blocks came out pretty good for my first try.  The motifs were fun and big enough to keep me out of trouble!


Appliques for the corners

For the back I chose a pretty paisley print to match the bright colors on the front.
It's hard to see but if you look behind the flip flops you can kind of see the quilting.  It's an overall pattern of big splashes to resemble waves crashing on the shore.  (LOVE the flip flops with their ribbon straps!)


Adding the borders and appliques to the final layout was a challenge.  Once again I reached out to my sister Dutchy for advice.  I hadn't considered that the applique blocks were all different sizes and the background is white but there's no white in the main body of the quilt.  We spent well over an hour rearranging the appliques and trying out different borders to get it just right.

I decided to add a 1 1/2" white inner border to frame the main part of the quilt and tie in the white background on the applique.  The final addition was the colored blocks and blue "water" borders.  The binding frames out the appliques and works well with the paisley on the back.

The finishing touch was the label which I wrote about a few days ago.

I love the way it all turned out!
 
A "Happy Birthday" Day At The Beach!