Tuesday, October 1, 2013

Hair Options

Our Once-A-Month Quilt Group enjoyed a lovely fall evening at Jane's last month.  The weather was beautiful, no rain!  That's an inside joke. You see the gatherings at Jane's usually come in the spring and the fall when the weather is rainy and cold.  But this time we were lucky, the weather held out. 

I forgot to take pictures of the show and tells but I did get a few close-ups of Deb's "People" quilt.  Dutchy is making one for herself and is working on the hair.  There's lots of little people on this quilt and she's running out of hair options!

These are a few of the hairstyles on Deb's quilt.  Pig tails, curls, braids . . .
 
Short and long . . .

 
and one poor little girl (in red) with her face sewn to the shoulder of her dress!  Deb says she must have been really tired and nodded off but didn't notice at the time.  Then when she went back to do the hair she realized what had happened.  We say there may have been adult beverages involved ;o) 
 
 
Either way, her hair is FABULOUS!  Deb's leaving it just the way it is.  I think she looks like she's dancing.  It's just one more fun thing to see in the quilt. 
 

Three of the girls each made this fun little quilt and displayed it at the Capital Quilters Guild Quilt Show in 2009.  Deb and Carol each made two sets of the nine patches then swapped with each other to get a great mix of blocks. 

Deb, Dutchy, and Carol with their "People" quilts
(2009 Capital Quilters Guild Quilt Show)

If you take a look at the corners you can see that Dutchy made her outside borders square while the other girls made theirs angled.  Both options came out really nice. I love the repeat of the red fabric used on the inner border on the binding.


This was no quick project that's for sure!  Each of the little people has a different outfit on and different hair style.  The people and their cloths are all fusible applique. The hair styles are done with embroidery floss and/or yarn.  Here's a close up of Dutchy's.  This beautiful quilt was a gift that she gave to the Rector and his wife at St. Paul's School (where she worked) to remind them of their world travels.  They absolutely loved it. 


So after giving the quilt away as a gift the group of girls at the local quilt shop got together and gave Dutchy some beautiful fabrics so she could make a second quilt for herself.  It's still a work in process and she's finishing up the hair.

I hope she uses this one again it's my favorite!


Hope you're inspired to make your own "People" quilt.

Tuesday, September 17, 2013

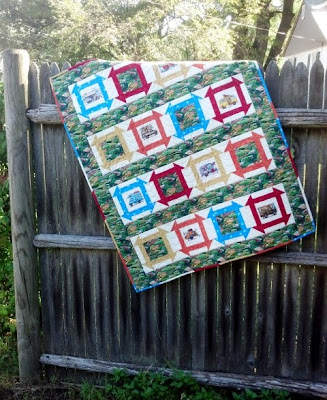
Camper Churn Dash Finish

Here's a little cutie that's been calling out to be finished for ages.  I found this cute camping print that I thought would be just right to use on my friend Betty's quilt.


Then my sister had these cute little campers that seemed like  just the right thing to go with it!  Then I remembered that Betty enjoys camping in a tent!  So the campers just wouldn't do and they got put aside while I finished the real quilt for Betty and several others.  Now, nearly two and a half years later, I've decided to finish it.


As you can see I chose the Churn Dash patter for the blocks.  There were only a few campers so I used the green print as the alternating block.  I just loved finding all the bright colors to use as the churn dashes.  This was truly a scrappy quilt since all the fabrics came from my stash.  I'm so proud of myself for not going out and buying more fabric!  It's the little things in life isn't it?

Along the way I had some "help" from the cats.  That's Alice camped out on the ironing board.  I had to keep moving the iron every time I stopped pressing and went back the to the sewing machine.


Then Guppy decided that it wasn't fair for Alice to have all the fun so he joined her.  I don't know how to fix those shiny eyes in the picture - they are cute cats in person :-) no really they are!


Here's the layout for the quilt in process.  Shaping up nicely.  This one went together much easier than some of the others I've done.  The color choices were pretty obvious and having that green print to tie it all together was great.


I decided since I had so much of it I would use it as a sashing, borders, and backing.  I used left over solids and white for the scrappy binding.

 
The quilting came out just perfect!  I told Lorri I wanted something with a camper in the borders and sashing with rolling hills on the blocks.  You can clearly see the rolling hills but the special pattern she created for me is hard to see.  Here's a picture showing it in outline form.  Again, not the best picture taking or drawing but you get the idea.
 
 
Guppy continued to assist throughout the entire project.  Since he believes he is the center of the universe I could just imagine what he was saying:


He's really a cute, loving cat; just don't try to skip a meal!  So every night at 10pm I'd have to stop what I was doing and feed the cats.  Some nights I stopped sewing but other nights I was ready to keep going.  In the end it turned out like this.


Some close-ups.


And just for the record, this one is for me!  Hope you enjoyed seeing it as much as I enjoy making it.
 
Now I'm off in search of another unfinished project to work on - and believe me there are plenty of them around! 


Sunday, September 8, 2013

Flannel Finish

Gee it's been forever since I've felt like I had time to post something.  I really admire those bloggers who are so proficient at keeping their blog up to date!  I have to admit I've not been doing a lot of quilting lately so there really wasn't much to say.  Now that the weather has changed here in New England and the humidity is gone I'm getting the quilting bug again.

Before I start writing about my latest project I need to catch up on one or two of my previously finished projects.  Let's start with this flannel one.  This is a project that was actually finished and delivered back in May.  I have a very dear friend that lives on a lake and I'd wanted to make a quilt for her and her husband.  So it had to be pretty but masculine at the same time.  As I poked around my stash I came up with this fun flannel fish fabric!


The fish are different types of salmon (my friend loves salmon!).  And then I found these flannel fat quarters in fall colors, plaids, and little flowers.  Seemed like just the right mix!


Deciding on a block was easy; the disappearing 9-patch is a quick fun block I’ve used it several times and loved the end results each time.  Deciding on a layout took a bit longer but after several tries I decided that what was missing from the block was the fish!  So I checked my yardage and had enough for the backing and the blocks.  Here’s what the final block looked like after it was cut and the pieces rotated.  If you have a novelty print that has a specific orientation then rotating the blocks can be tricky. For some of my previous quilts with this block I tested them first. 

 
In this case, I wanted to make sure that the fish were swimming upright but they could have been rotated any which way and still been fine.  Once the layout and rotation was determined I simply strip pieced the blocks together.


Before bringing the finished top off to the long arm quilter I had to piece the back.  Now most of the time I don’t pick a fabric that has such a distinct pattern so piecing the back just means doing the math, cutting, and sewing the pieces together.  But for this backing I just felt the fish would look weird if they were cut in half and a head swimming into a body!  Kind of ghoulish don’t you think? 

So I took the time to match the pattern and I had whole fish swimming happily around when it was pieced together. Phew!  Funny how I was hearing my mother’s voice as I lined up the pattern (not literally, they lock you up for that!).  She would have been saying “if you’re not going to do it right then don’t do it at all, it only takes a couple extra minutes to get it right!”  How true, and I’m so glad I did it.  Mom would be proud.  :o) 

I love picking out just the right quilting pattern.  This one looks like ripples on the water.  Having a long arm quilter that works with you is one of the best things.  Lori Wurtzler of Seventh Heaven Quilting here in NH has been doing a great job for me.  I always feel like she’s as excited about how the finished quilt will look as I am.  I didn’t get a very good picture of the quilting but if you look closely at the gold and cream squares you can see it.


For the binding I used the same cream fabric that was in the block.  I didn't want to distract from the scrappy nature of the layout so I didn't include any borders or sashing.


And what quilt would one of my quilts be without the “Guppy Quality Check”?

 
Once it passed the Guppy test the label was all that was left.  As I’ve often said I really don’t like to have a huge white block on the back of the quilt.  I always fine it distracting.  Sometimes you have to do that but I try to at least incorporate some type of fabric from the front to tie it all together.  For this one I just wanted to put my name and the date on it because I loved how the fish looked swimming around in the water.
 
 
The finished quilt came out beautiful and my friend loved it.


I hope you'll give that disappearing 9 patch block a try I think it will become one of your favorites too!


Tuesday, July 23, 2013

Never a Dull Moment

Last Friday was our once a month quilting group but I didn't make.  I was on a brief trip to California earlier in the week and needed to get back to East Coast Time.  So there are no quilting pictures to share today but I've got a few pictures from the storm that went through our area in the wee hours of the morning. 

Saturday morning I was enjoying a leisurely cup of coffee when I got a call from a friend of mine in Concord.  She and her husband were driving by my rental property and noticed a tree was down.  The storm had blown a branch out of the tree which landed on the garage roof.  I'm thinking OK, it's a branch, maybe a few shingles got damaged but I wasn't too concerned.  She asked if I wanted her to go check on it as there seemed to be no one at home.  So she did and sent me a couple of pictures.  That's when I knew I needed to get up there and take a few more.  My sister Dutchy joined me to check it out all out. 

Here's what it looked like from the road when I arrived.  Still not too bad but it did reach the truck that belongs to my tenants.

 
Then I walked around to the back to check the house which I knew wasn't hit but wanted to see for myself.  Here's what it looked like from across the yard.


The shed was OK and the house was fine but it's starting to look a little scary now . . . and as I round the corner of the garage here's the real damage.

 
=:-O   And just in case you can't see it here's a close up!


Now keep in mind that this tree is about 10 feet BEHIND the garage and the top of the branches were covering the truck in the driveway!


We're not sure but we think the truck is holding up the tip top of the tree and that's why it didn't crash all the way through.

So the good news is no one was home so no one was hurt.  I spent yesterday making calls. I've gotten in touch with the insurance company to file a claim and called 3 tree removal people for estimates.  I'm waiting to hear back from everyone this morning and of course it's pouring rain now so now the inside of the garage and the open walls and roof are all getting wet.  I knew I wanted to fix up the garage at some point but this was not the way I was planning to go about it!  But I am thankful that the brand new kitchen didn't get hit.

Anyway, it's hard to realize how big that tree is until you see this:

 
That's a trash barrel near the shed and this is just a LIMB off that tree.  It's BIGGER around than a trash barrel - OMG!  There are 3 more limbs the same size still on the tree which will have to come down to keep everyone safe.

So I'll keep you posted on the event that is my life but for now I'm going to take a shower and have another cup of coffee.

Friday, April 26, 2013

Monthly Quilt Group

Has it really been that long since I posted something?  Yes!  According to my Monthly Quilt Group it's been just forever.  Needless to say they were laying the guilt on pretty thick at our last get together.  All in good fun of course ;-)
 
Not that I haven't been busy with several projects its just that two of them I can't write about yet and the other two are still at the same stage as the last time I wrote about them.  So I've got some fun show and tell shots of the project that each of the Group members are working on - except the other Deb, for some reason I didn't get any pictures of her project.
 
Here are the rest of the gals with their quilts.  First up is Jane and the Houses BOM quilt.  I love the secondary pattern created by the two toned Courthouse Steps blocks.
 
 
Here's a close up of it.
 
 
Next is Carol.  She's been working on these beautiful applique blocks for quite a while now.  It looks wonderful all put together.  The black background is so striking! 
 
 
Here's a closeup of Carol's wall hanging. Those flower colors are just popping off that black.
 
 
Here's my sister Dutchy just back from her annual trip to Florida.  This snowbird was busy while she was down there for 3 months.  Golfing, swimming, and even teaching a quilting class!  She has promised to share her pictures of the quilt that her quilting class made and raffled off.  When I get them I'll be writing a post to share with everyone.
 
 
Her project is hexagons.  She's making a table runner to go in her kitchen.  I didn't get a clear picture but you can see how she fussy cut those fun chickens She'll have 3 of these hexagon chicken blocks on a beige background for the full table runner.
 
 
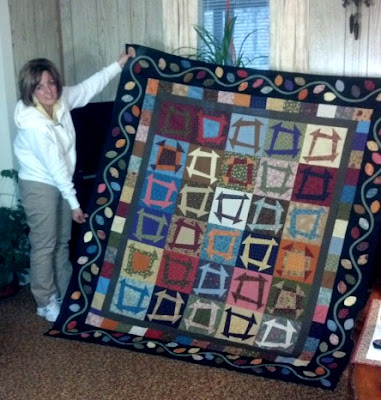
This is Tami and her Wonky Churn Dash quilt.  This was a class at the local quilt shop taught by Charlene, one of the other gals in our little group.  Wish I had been able to make it for this class.  Great colors! 
  
 
And she added that fun applique border. She's a whiz at applique, not just fast, her hand work is also beautiful.
 
 
 In addition to the churn dash quilt, Tami also had this cute applique wall hanging.

 
Here's a close up.  I just love those fun flowers, so pretty!


No pictures of Charlene this time, she was off to Maine to visit family. I'll catch her next month. 
 
And even though I didn't get any pictures of the other Deb's project I can tell you it is a beautiful full/queen size quilt that she is hand quilting. The blocks are hand embroidered flowers of each of the 50 states that her grandmother started. Deb is putting the finishing touches on it with beautiful floral sashing and cross-hatched hand quilting. It is just beautiful. I'm pretty sure our next get together is at her home so I will definitely take some photos of it.
 
Oh yeah, and no pictures of me this time because the project I was working on is a gift.  Besides, my face was so red in the pictures it looked like I'd been out in the sun too long.  LOL
 
A big THANK YOU to Jane for hosting this month. Jane's turn is always in April and it's always raining but this time, just for the record, NO RAIN!!!
 
See you girls next month and I promise to catch up on my blogging :o)
 

Tuesday, March 5, 2013

Layouts for Flannel Half Square Triangles

I had some fun over the weekend playing around with the half square triangles (HSQs) I made from those old flannel shirts.  The challenge has been to create a beautiful quilt from fabrics I have on-hand.  Here's what came up when I added some white flannel from my stash. 

I used the tube cutting method and it went pretty quickly.  One thing I have learned from working with the flannel is the different weights can really make a difference in how much stretch you get in the triangle.  I was careful not to press too much and kept the handling to a minimum so the whole thing came out pretty flat.  The individual HST blocks are about 5 1/2 inches square.

Layout # 1:  Diagonal lines with alternating the plaids.  Not very inspiring but I was just getting started.


Layout # 2:  Friendship Stars - again, rather typical and a bit dull.  Plus I didn't have enough white to fill in the background.


Layout #3:  This is one below I just loved!  I didn't have all the HSTs made so you kind of have to imagine where it was going.  I added some of the charms from a flannel charm pack of flannels that my mother had given me.  It just brightened up the whole layout.  I think I've got one of these layouts in my future with different fabrics from my stash.


Layout #4:  I decided to add the charms to the white corners of the HST blocks and ended up with this combination.  I just cut the charms into 4 equal squares and sewed them on "snowball" style.  Then I laid them out on the design board and mixed them around until I like the way they came together in the middle of each 4 patch.  I'm pretty sure this block has a name but I can't remember it right now. 


Anyway, the final layout looks like this.  It's really nice!  I'm probably going to add a narrow border just so the points don't get lost when I put the binding on.


And of course, Guppy is keeping a close eye on the progress from his prime vantage point at the end of the ironing board!


The top is all together and measures 31" wide by 41" long.  A nice size for a lap quilt.  Since I don't have any big pieces of flannel for the backing I'll be heading up to my sister Dutchy's house to see what she's got in her stash.  It's like shopping but it's FREE!

Stay tuned for the finish at the end of this week.