Showing posts with label binding. Show all posts

Tuesday, September 17, 2013

Camper Churn Dash Finish

Here's a little cutie that's been calling out to be finished for ages.  I found this cute camping print that I thought would be just right to use on my friend Betty's quilt.


Then my sister had these cute little campers that seemed like  just the right thing to go with it!  Then I remembered that Betty enjoys camping in a tent!  So the campers just wouldn't do and they got put aside while I finished the real quilt for Betty and several others.  Now, nearly two and a half years later, I've decided to finish it.


As you can see I chose the Churn Dash patter for the blocks.  There were only a few campers so I used the green print as the alternating block.  I just loved finding all the bright colors to use as the churn dashes.  This was truly a scrappy quilt since all the fabrics came from my stash.  I'm so proud of myself for not going out and buying more fabric!  It's the little things in life isn't it?

Along the way I had some "help" from the cats.  That's Alice camped out on the ironing board.  I had to keep moving the iron every time I stopped pressing and went back the to the sewing machine.


Then Guppy decided that it wasn't fair for Alice to have all the fun so he joined her.  I don't know how to fix those shiny eyes in the picture - they are cute cats in person :-) no really they are!


Here's the layout for the quilt in process.  Shaping up nicely.  This one went together much easier than some of the others I've done.  The color choices were pretty obvious and having that green print to tie it all together was great.


I decided since I had so much of it I would use it as a sashing, borders, and backing.  I used left over solids and white for the scrappy binding.

 
The quilting came out just perfect!  I told Lorri I wanted something with a camper in the borders and sashing with rolling hills on the blocks.  You can clearly see the rolling hills but the special pattern she created for me is hard to see.  Here's a picture showing it in outline form.  Again, not the best picture taking or drawing but you get the idea.
 
 
Guppy continued to assist throughout the entire project.  Since he believes he is the center of the universe I could just imagine what he was saying:


He's really a cute, loving cat; just don't try to skip a meal!  So every night at 10pm I'd have to stop what I was doing and feed the cats.  Some nights I stopped sewing but other nights I was ready to keep going.  In the end it turned out like this.


Some close-ups.


And just for the record, this one is for me!  Hope you enjoyed seeing it as much as I enjoy making it.
 
Now I'm off in search of another unfinished project to work on - and believe me there are plenty of them around! 


Sunday, September 8, 2013

Flannel Finish

Gee it's been forever since I've felt like I had time to post something.  I really admire those bloggers who are so proficient at keeping their blog up to date!  I have to admit I've not been doing a lot of quilting lately so there really wasn't much to say.  Now that the weather has changed here in New England and the humidity is gone I'm getting the quilting bug again.

Before I start writing about my latest project I need to catch up on one or two of my previously finished projects.  Let's start with this flannel one.  This is a project that was actually finished and delivered back in May.  I have a very dear friend that lives on a lake and I'd wanted to make a quilt for her and her husband.  So it had to be pretty but masculine at the same time.  As I poked around my stash I came up with this fun flannel fish fabric!


The fish are different types of salmon (my friend loves salmon!).  And then I found these flannel fat quarters in fall colors, plaids, and little flowers.  Seemed like just the right mix!


Deciding on a block was easy; the disappearing 9-patch is a quick fun block I’ve used it several times and loved the end results each time.  Deciding on a layout took a bit longer but after several tries I decided that what was missing from the block was the fish!  So I checked my yardage and had enough for the backing and the blocks.  Here’s what the final block looked like after it was cut and the pieces rotated.  If you have a novelty print that has a specific orientation then rotating the blocks can be tricky. For some of my previous quilts with this block I tested them first. 

 
In this case, I wanted to make sure that the fish were swimming upright but they could have been rotated any which way and still been fine.  Once the layout and rotation was determined I simply strip pieced the blocks together.


Before bringing the finished top off to the long arm quilter I had to piece the back.  Now most of the time I don’t pick a fabric that has such a distinct pattern so piecing the back just means doing the math, cutting, and sewing the pieces together.  But for this backing I just felt the fish would look weird if they were cut in half and a head swimming into a body!  Kind of ghoulish don’t you think? 

So I took the time to match the pattern and I had whole fish swimming happily around when it was pieced together. Phew!  Funny how I was hearing my mother’s voice as I lined up the pattern (not literally, they lock you up for that!).  She would have been saying “if you’re not going to do it right then don’t do it at all, it only takes a couple extra minutes to get it right!”  How true, and I’m so glad I did it.  Mom would be proud.  :o) 

I love picking out just the right quilting pattern.  This one looks like ripples on the water.  Having a long arm quilter that works with you is one of the best things.  Lori Wurtzler of Seventh Heaven Quilting here in NH has been doing a great job for me.  I always feel like she’s as excited about how the finished quilt will look as I am.  I didn’t get a very good picture of the quilting but if you look closely at the gold and cream squares you can see it.


For the binding I used the same cream fabric that was in the block.  I didn't want to distract from the scrappy nature of the layout so I didn't include any borders or sashing.


And what quilt would one of my quilts be without the “Guppy Quality Check”?

 
Once it passed the Guppy test the label was all that was left.  As I’ve often said I really don’t like to have a huge white block on the back of the quilt.  I always fine it distracting.  Sometimes you have to do that but I try to at least incorporate some type of fabric from the front to tie it all together.  For this one I just wanted to put my name and the date on it because I loved how the fish looked swimming around in the water.
 
 
The finished quilt came out beautiful and my friend loved it.


I hope you'll give that disappearing 9 patch block a try I think it will become one of your favorites too!


Monday, February 4, 2013

Finished Christmas Trees

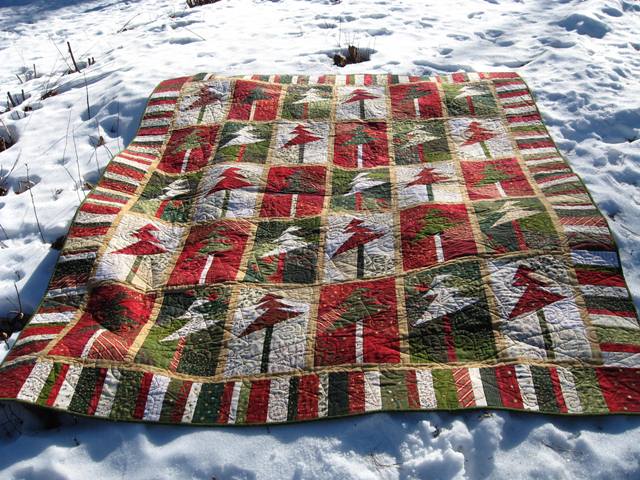
For someone who has all those projects piled up I'm not getting much done!  I did manage to finish the Whacked Christmas Trees so I'll share that with you today.  If you're interested in how it all came together you can see the process in the October 2012 archives.

The quilting on this came out just lovely.  It is done with red thread on the front and gold thread on the back. My picture taking skills are not as advanced as my quilting skills but I gave it my best shot.

The quilt pattern is actually Christmas Trees!  How original right?  I had planned in my head to have stars as the quilt pattern but during the "looking" process - that's where Lorri patiently scrolls through the tons of patterns she has on her computer while I look for the one that strikes my fancy.  We started out looking at stars but when this pattern of trees came up we both went - that's it!

If you look closely in the picture above you can see, at the top and bottom center of the picture, inside the white fabrics, two upside down trees.  The squiggle is part of the connecting lines.  It's always so exciting to see the finished product.

Here's a shot of the back - I manipulated the color in the photo to highlight the quilting so it looks kind of orange but it's really a beautiful Christmas red.  The trees look like they are dancing around having a party!  Lorri did a great job and as always it was fun collaborating with her on the quilting pattern, thread choices and even the binding color.  Thanks Lorri, that shade of green was the perfect choice.
 
 
Again, sorry for the poor pictures of the quilting but how's a girl supposed to get great pictures when the cat wants to be in the photo shoot?  (Besides the cat you can also see the green binding in this picture.)


That's Alice who jumped up on the sewing table while I was in the office downloading the pictures to the computer.  She has claimed this quilt as her own but I'm putting up a good fight, this one is for me.  It is currently laying over the back of my favorite recliner just waiting for me to take a nap ;-)  She's been poking her head up under it all the way to her shoulders.  I'm not sure what she's doing but I get the feeling she thinks we can't see her when her head is covered up !!!

I did manage to get a couple of nice pictures of the whole quilt outside.  This is in the snow on the hill next to the driveway.

 
Here's my favorite, hanging on the fence.  You can't see the top row of trees but isn't it pretty?  It was bitterly cold here in NH that day and the wind was blowing so I only got a couple of shots but the lighting was much better out doors.


And finally, a close up.


I hope all my friends in the snowy states are keeping warm and dry this winter!

As for that pile of other quilting project that's waiting for me I have actually started on a couple of them - Birdies, Bunnies, and a red-white-blue scrap quilt.  Did I mention I also went shopping for fabric?  Call me crazy but I'm looking for just the right shades of blue and cream for someone special.

I'll see if I can get the cat off the sewing table long enough to get some good pictures and write again soon.  Stay tuned.

Thursday, October 25, 2012

Whacked Trees: Row by Row

Slowly but surely I've been nibbling away at the Whacked Christmas Trees.  After all 30 blocks were constructed I laid them out on the design wall.  I took a step back and all I could see was one HOT MESS!  

You all know I'm not a fan of scrappy quilts yet when I did the wacky pumpkin quilt it turned out beautifully.  In fact it's one of my favorites!  I keep telling myself this one's going to be great too and I do love each and every fabric in it but boy I'm not in love with it yet.

The blocks by themselves are really cute.  Even side by side on these blue trays I use for organizing they seem to be fine together.  Hopefully, once I get the final border on I'll like it more.


In an attempt to give myself some order in the scrap heap on the wall I decided to add in some sashing.  I found this great fabric that I had used as a backing for Betty's quilt and as one of the blocks for Kim's quilt.  (The only one of The Girls quilts that's not been delivered yet!)

This fabric is a favorite of mine, from Joann's, because it's so versatile.  I mean really, what other fabric goes with cookies, camping, cats, birds, beer, and now Christmas trees!

Here's a peek at some of the Whacked Christmas tree blocks with their sashing.  I used a 1" sashing to go along with the skinny tree trunks.  It's kinda "growing" on me!


By the way, several of you have asked me about my story for Mary's quilt.  All I can say is I cried when I delivered it and I keep getting choked up when I try to write the story!   Here's Alice helping me put the binding on Mary's quilt.

 
Hang in there, I'll get it written soon I promise.

Friday, July 1, 2011

Finishing The Watermelons

It's getting down to the wire for the upcoming wedding so I've been diligently working on the Watermelon quilt. You may remember on my previous post "Watermelons for Miles and Courtney" I was struggling with not enough fabric for the backing.

No matter which way I calculated it, the 3 yards of beautiful watermelon print I had just weren't enough because it's directional.


I ironed it, I measured it, I flipped it around, I ironed it again, I flipped it this way, then that way; I tried and tried and tried to make it work. The harder I tried the harder it got.


Finally, I decided to use the print as a center panel and put a border around it. Off to the fabric store for some green "rind" colored fabric. I found a great match and stitched the whole thing together but had to call the Lorri to let her know I'd be late with dropping it off.


Lorri Wurtzler, whose longarm quilting business, Seventh Heaven Quilting, is just minutes from my home in southern NH has been doing a great job on the quilts I've brought her. The watermelon quilt is just one of three she has quilted for me recently. Working with Lorri to choose the pattern and the thread for the finishing touches is a great part of the creative process that's really fun for me. I usually have an idea of how I want the quilting done and she is able to take that idea and execute it with beautiful results.  Longarm quilting is a life saver for me! I would never have been able to quilt any of my projects, by hand or machine, and get them completed when I wanted them.

Here's a peek at the back corner before I got the binding on. The border on the watermelon fabric turned out fine. You can clearly see the vine/leaf pattern here on the green border.


But what really makes the whole quilt top is the contract of the deep pink threads on the whites of the quilt top. It is pretty in the pictures but just beautiful in real life!


With the quilting completed it was time for binding.  I had been using the same binding instructions for the past ten years.  One of the things that I really didn't like was how bulkie the closure was when you got to the end.

I decided to go on line to see if there was an easier way. I saw a tutorial on the Missouri Star Quilt Company's You-Tube site. They were demonstrating a new template used to make bindings. I was so excited I was ready to send away for it right then and there! That is until, after a few watching a few other videos, I came across one that showed how to do the very same thing without the template. Since time is always of the essence for me I studied the video and tried the new technique. So, I'm not usually the first to do most things but I catch on pretty quickly.  With a little practice, this technique worked like a charm!


Oh, and a second tip I found was winding the prepared binding into a coil. I used to just gather it all up and drape it over my shoulder for safe keeping as I sewed. The coil worked much better.

All the machine stuff was done. Now to the relaxing part, hand sewing the binding. I've seen some videos of people using the machine to finish off their bindings but unless it's a small project I'm not sure I'd want to do that. I enjoy taking my work out of the sewing room and spending time watching TV with the family. Sports are always a good choice for this activity. Luckily here in New England we have four championship teams: the Celtics, the Patriots, the Bruins, and the Red Sox to keep us entertained. Since it's summer now we are taking in the Red Sox games. So I grabbed the quilt and my sewing basket and headed to the living room.


Now you may remember that Guppy is often fussing around my sewing table as I sew but I don't think I've mentioned Alice. Alice is Guppy's sister. She's pretty and she knows it. She feels no need to get involved with the noisy sewing machine activities (although the ironing board does appeal to her so I always have to close it up if it's not in use). Instead, she naps in the kitty bed placed on what was supposed to be the comfy chair for me to use in my sewing room. Oh well . . . 

Alice decided that getting a close up view of the hand sewing of the binding would be a good way to get involved in the watermelon quilt. One evening she strolled in to the living room as I was getting all comfy and ready to sew.  You know how it is, you get the lighting arranged just right and everything within arms reach. She announced herself with a meow, then parked herself on the coffee table. Watching me from across the room.  Just taking it all in, no big deal. Certainly nothing she was interested in.


As I started to sew she came closer, sitting beside me, just touching the quilt at the edges.


She gave it her best "I'm ignoring you" pose, acting as if she really wasn't interested in any old quilt. After all, quilts are all over the house, what's so special about this one? (Settling in a little closer.)


I asked her how I was supposed to get anything done if she was on the quilt. Her ears twitched back and forth in the "don't bother me" pose, which lead to full on relaxing in anticipation of a good nap!


Well, on this particular day the temperature was in the 80's with very high humidity. The quilt in my lap was hot enough but adding the lounging cat was more than I could take. All I needed now was a random hot flash and I be a gonner! I left her and the quilt in the comfy spot, with the lighting just so and everything within arms reach.  I got myself a big glass of iced tea to enjoy the rest of the baseball game leaving the sewing for another day.

Over the course of the next few evenings, as the Red Sox climbed higher up in the standings, the weather cooled considerably and I was able to finish the binding.  Alice never showed any more interest in the watermelon quilt!


Next up, the label.  Check back in, it'll be finished soon because the wedding is July 4th weekend!

In the meantime, do your pets enjoy your hobby as much as you do?