Sunday, March 29, 2015

Round Robin #7 - Sleeping Under the Stars

For several years now I've been thinking about making a quilt I saw in a magazine ad.  It's a beautiful quilt made with green batik fabrics.  It's shown hanging over a fence with a horse standing near by.  This quilt just spoke to me and I thought it would be perfect for my sister Sue.


Scraps from my very first quilt!
But with so many quilts on my to do list I didn't know if I'd ever get around to making it so I decided to use it for my Round Robin project.  It's a simple block that I hoped everyone would enjoy making.  I love that it would reveal a secondary pattern once the blocks and rows were sewn together.  


My color choice for the Round Robin was strictly influence by the need to reduce my stash!  I also wanted to find colors that the other girls would already have in their stashes.  I didn't want anyone to have to go out and buy fabric for this project.  And lastly the color choice was so I could put the quilt on our bed and not worry about the cats making it a cozy place for a nap.  ;o)

I was so intrigued by the pattern in that add.  It looks like pinwheels but it also looks like rail fence.  So how'd they do that?  I was hoping I could get a close up of it on the internet somewhere so I did some snooping and found it. What did we do before the internet?!

The block, as I said, is pretty simple.  It's a rail fence with a contrasting triangle added to two of the rails.  The key is to put the triangles onto the rails BEFORE making the block.  


Since I wanted the quilt to be scrappy I took some of each of the fabrics, made rails, then added triangles.  


This makes a cute block and doesn't require any matching of seams when you sew the blocks together until . . . 


. . . you put the ROWS together.  That's when you can see that the triangles are starting to create a secondary pattern.  So color choices are very important.  If the little triangles are too close to the color of the rails the pattern is not as obvious.  

Here's my original row.


And here's the piece after each of the other girls had added their rows.  They all did a great job!  I just love how the pinwheels are popping out from the rails.


My plan for this project is to create a queen sized quilt that I can use on our bed.  Finally I'll have a truly scrappy quilt.  Since the secondary pattern looks like little stars I've named my quilt "Sleeping Under The Stars".

I hope you'll come back and see the designed I've created for the final quilt!

Have you made any quilts with secondary patterns?


Friday, January 16, 2015

Round Robin # 6 - Spring Table Runner

Now this is how I envisioned our Round Robin would go!  Jane created a lovely basket of flowers as the start of her Round Robin project.  The large flower in the center is a yo-yo! Jane's project book said she wanted a spring table runner.  

Each subsequent person followed her lead by doing an applique with a spring theme.  And each managed to include a little bit of their themselves in their block.  All of them are beautiful hand appliqued pieces!  


When I originally joined this small band of quilters I was in awe of their skilled handy work.  I loved what they were doing but as a brand new quilter I didn't think I'd ever get to their level.  Slowly over the years I've had lots of opportunities to learn from all of them.  I now feel confident enough to tackle simple hand applique work and some day hope to hand quilt something of my own.

Of course Dutchy was the one who introduced me to quilting and taught me all about using the rotary cutter.  Including a lesson we BOTH learned about keeping your hands away from the blade!  Red work is another talent she's shown me.  She has several groups of beautiful red work (and blue work!) blocks she's done that I hope will some day get into several quilts.

For Jane's table runner Dutchy had this cute idea for using hexies as the flowers in her block.  She added a button in the middle of each one.  


Carol's block includes some embroidered stems and buttons to embellish the centers of the flowers.  Carol's hand embroidery is beautiful and this is just a little example of it.  Each month I look forward to seeing her progress on the "State Flowers" she's doing.  She and Jane are both doing the state flower blocks and it's fun to see the different ideas for colors and techniques they are using.


Tami's our expert applique artist.  She's good and she's fast!  She's helped me with becoming brave enough to try my own applique projects.  The first one I did was on the Twiggy quilt I made for a wedding present.  She taught me how to use the English paper piecing method.  It wasn't the first applique method I tried but it's was the first that actually looked good when I was done!


Charlene's block was the same one she used in her own Round Robin project bringing the project together in a unique way.  The bird and egg definitely signify spring.  As a quilting teacher Charlene has provided all of us with tips, tricks, and techniques for piecing all kinds of project through her classes.  Having her as part of our small group gives us a chance to pick her brain once a month!  She's a talented quilter and a genius with scraps! 


Deb R.'s block is her signature bee and bees-keep.  It's something she likes to include in her quilting and we've all come to recognize it.  The name Deborah means "bee" and Deb is certainly the embodiment of a busy bee.  She's great at so many things from refinishing furniture, quilting, and cooking, to Tree House building!  She typicality has half a dozen project in several mediums going at the same time.  Her energy is contagious and her creativity inspiring.


With all these talented, creative people making these beautiful blocks I just knew I had to put them all together so Jane would have a finished table runner.  For my addition I chose to do the sashing and borders.  The colors for all of the blocks were just lovely.  Each one had a bit of golden yellow and some blue.

I found these two great fabrics in my stash.  Although the blue initially seemed dark to me it had that pretty little golden yellow flower that worked beautifully with the golden sashing I picked.


With all the blocks up on my design wall I was able to come up with several layouts.  I really struggled with doing a long narrow table runner or a rectangular one.  I was concerned that if I did them all in a row it might not fit on Jane's table. Even now I question my choice.  This layout seemed to be balanced and light  but maybe a single row was what she really wanted.  Which order would you have put them in?


Here's Jane with her finished Spring Table Runner.  She really liked it and I hope she'll use it.  I gave her the rest of the blue fabric and I told her I would not be hurt if she changed it to the long single row of blocks.  I don't think you can go wrong with such pretty blocks!


Next up will be my Round Robin project, #7 and that last of the series.  I hope you'll come back and check it out!

Sunday, January 11, 2015

Round Robin # 5 - The Tree!

Upper left corner of "The Tree"
when I first got it.
Doing a sewing project as a group can be fun and challenging.  And for any quilter, whether experienced or just starting out, a Round Robin can also be a bit scary!  When we began our little adventure I was feeling pretty confident.  I love a challenge and now that I've been quilting for nearly 15 years I figured I could deal with a simple Round Robin.  Little did I know what was in store!

I wasn't at the first gathering where everyone exchanged projects for the first round.  I'd heard rumors from the other members: 'have you seen"'The Tree"?'  'Wait til you see "The Tree"!'  'Oh my goodness, "The Tree" !  . . . 

I was curious but I'm a rule follower so no peeking allowed and besides, I didn't want to spoil the surprise.  I like surprises!  So I didn't actually see "The Tree" until it was my turn to work on it.  When I first took it out of the bag I was not only surprised but fascinated!  The trunk has several layers of fabrics with different textures and the leaves are 3-D.  She used batiks for the backgrounds which simulate the land, the river, and the sky. 

The Tree is what I consider an 'art' quilt.  I've never done an art quilt and honestly working on an art quilt created by someone else sent a shiver of panic down my spine.  As I said, I'm a rule follower but 'art' doesn't have any rules!  

I began the project, as with all the other projects, by hanging it on my design wall and leaving it there for inspiration.  When we started the Round Robin we were each given a little note book that we used to describe why we chose our particular project and what we wanted it to be in the end.  So I took out Deb's book read the back-story.  

The gal that created this art work, Deb R., has been a lover of tree houses since she was a young girl.  In her note book she quoted the poem "Trees" by Joyce Kilmer.  I remembered studying that poem in English class in high school and it was a nice surprise to read it again. It starts out "I think that I shall never see a poem as lovely as a tree . . .".  

Deb went on to describe her first tree house and her wish to create one in the tree outside her new home.  She had been telling us her tree house plans at our monthly meetings so I had a hint of what she was planning.  She was going to enlist the help of her family and friends but intended to build it on her own as much as possible.  


I was the next to the last person to get The Tree.  Some of the others had put in some very creative additions.   

In the lower left Charlene had added Deb's two dogs.  

Carol added two kayakers on the river in their red kayaks.  

And Tami added an actual miniature quilt hanging on a clothes line with a basket of beaded flowers next to it. There's even a label on the back of the little tiny quilt!

This next picture shows the details of the batik border that Charlene added and the adorable turtle created by Carol.  You can also see some of the details in the tree trunk but you really need to see this one in person to appreciate the textures.


Next, in the far right right bottom corner just past the turtle and the ladder, you can see a big black bear added by Dutchy.  He's had enough of this craziness and is fleeing the scene!  There's also more of that beautiful woodland animals batik border.


As I surveyed the whole quilt it dawned on me that there were no people there to enjoy the tree house.  So for my additions I selected the "Fruit Bottom Ladies".  But I had to wait for the cat to finish his nap before I could cut anything.  


I picked 7 different women - one to represent each of the girls in the group - and added them to the quilt.  Since Deb has told us that this is a tree house for grown-ups I put two ladies sharing adult beverages on the deck.  Notice how the leaves are stitched?  There is fabric on both sides and doubled sided interfacing in between that makes them stand off from the surface.  It's just the coolest 3-D effect!  I couldn't capture it with my camera but it's just so fun.

Three other ladies are out on a limb watching the river and chit chatting away.  The white line over their head is the "phone" line for the two tin cans, one in the tree house, one in the garage, so the ladies can "call" for more refreshments. LOL


But there are two ladies missing.  Wait, I see them, down on the ground.  Hmmmm, could that be Deb trying to talk Tami up the ladder?  It's OK Tami, adult beverages can also be served under the tree house too ;o)


When I finished my additions I sent The Tree on to Jane.  She added a kite and some birds to the sky . . .


along with a cute 3-D tire swing!


I've probably forgotten a couple of items that got added but as you can see there's tons of stuff going on in this fun art quilt.  Each of us stretched beyond our initial apprehensions and came up with some pretty creative additions!

Deb loved the finished project and promised that when it was done it would be hung in the tree house for all visitors to see.


I thought I'd share this picture of the REAL tree house that Deb had posted on social media.  She is one happy woman with a real, grown-up tree house and a beautiful piece of art to hang on it's wall!


Next week is the final installment of the Round Robin and we'll look at Jane's project.

Sunday, October 26, 2014

Round Robin # 4 - Charlene

To illustrate how our Round Robin progressed I thought I would deconstruct this one for you.  Charlene started out with a pretty bird motif hand appliqued in her center panel.  (Don't mind the wrinkles, these projects have been handled a lot!)

I just love the little blue egg in the nest.

Dutchy added the first border of green fabric with hexies in the corners.  She added buttons to the center of each hexie for a little pizzazz.


Next came Carol and she added a border of blue half square triangles which picked up on that blue egg.  Very spring-ie!


You can really see how the wall hanging is starting to grow.  By the time it got to me Tami had added more hand applique.  Two lovely corner groupings of flowers, stems, and leaves on a pretty tea died background.  She used greens, blues, and pinks to pull in all the colors from the previous additions.


You can probably noticed the blue wording stitched on the corners opposite to Tami's handiwork.  When I received the project I just knew I had to do something in the blank corners.  This is where the challenge comes in, adding something that would compliment everyone else's work.  As I studied the project I decided that adding more applique would be too much.  I wanted a place for the eye to rest.  I had been so thrilled with the way the embroidery had come out on the last project (Signature Blocks) I decided to do some more emboridery on this one.  

Unfortunately, I forgot to take pictures of the project before I got started so I don't have any "work in progress" to show you.  But I do have a couple of close ups of what I did.  Many thanks to Charlene for sending me pictures of the finished project!

I know that Charlene enjoys Primitive patterns so I searched the internet for some quotes and some lettering that would give me an idea of what a "primitive" alphabet looks like.  I wanted the quote to be about spring to go along with the egg in the nest.  Since we started this project in the dead of a LONG, COLD, New England winter that seemed never ending I thought this quote said it all:

No matter how long the winter,


spring is sure to follow.

I'm not sure if the letters look all that "primitive" but I was very happy with the way they came out.  I chose to do the embroidery in a stem stitch with light blue perle cotton #5.  I found it gives a real clear look to the embroidery.  In second guessing myself I thought I should have used black instead of blue but Charlene has assured me that she likes the blue so it's all good.

Here's Charlene with the finished project including a cranberry half square triangle border from Jane and an outside border of leaves from Deb R.


Another pretty wall hanging ready for spring!

Sunday, October 12, 2014

Round Robin # 3 - Signature Wall Hanging

We had decided at our November meeting in 2013 that we would plan on doing the Round Robin starting in January of 2014.  By December my sister Dutchy was busy at work getting her first row ready.  She would be leaving for her annual trek to Florida just after Christmas but didn't want to miss out on our fun group project.

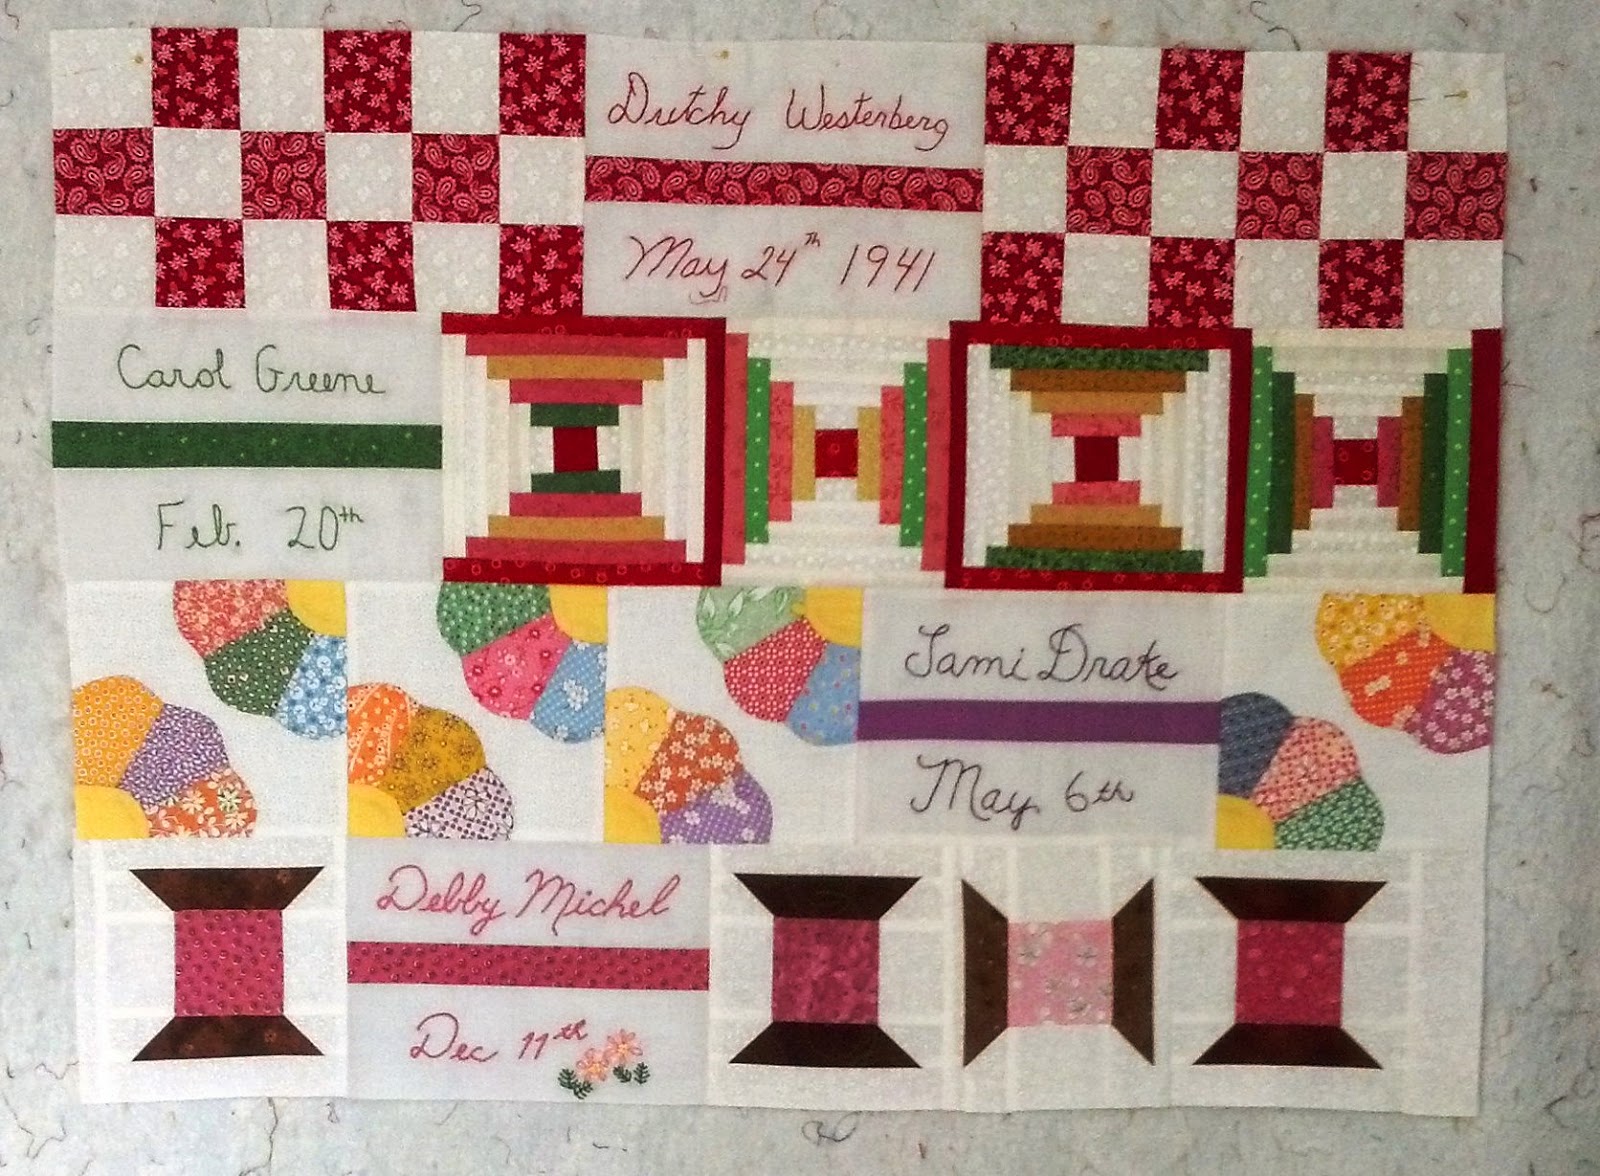
For her project Dutchy chose a signature block.  Her instructions said we could create a row using any block we wanted that represented something about ourselves.  In that row we were to add a signature block.

For her initial block she had done a beautiful job of embroidering her signature and birth date.  She then combined it with red and white nine patch blocks. Here's a close up.


Here's what it looked like by the time I received it.  Carol decided to leave off the year she was born and the rest of us followed suit.  And in the end Dutchy removed her 'year' too.


Carol added the Court House Steps block with 1" strips (finished).  I love the bold graphic look.  Tami added the pretty hand applique fans in 1930s fabrics.  Beautiful work done by both of them!

As the months go by in the Round Robin you can see that each time you get the next project bag there are more and more rows already in place.  Figuring out how to coordinate with the graphic pattern done by Carol and the light colors in Tami's blocks is part of the fun of a group project like this.  

Dutchy and I are sisters so there were many blocks that would have been appropriate to represent me to her.  Since sewing is one of the many interests we have shared over the years I thought the Spool block would be the best choice.  To create the spool block I started with several pretty pink fabric for the "thread" and a dark brown for the "spools".  


Putting the block together proved to be more challenging than I expected.  I didn't have a pattern so I just looked at some on the internet and improvised.  Once I figured out the appropriate size I laid out all the pieces.  I started with creating the angled edges of the spool.  


A little chain stitching meant it went together quickly but I had to pay attention to the direction of each white rectangles to make sure the angle was opposite on each end.  After they were all stitched I pressed them open, with the seam allowance pressed onto the dark fabric.


Here's a close up of all the parts of the block sewn together.


For the embroidery I used a stem stitch in #5 Perle Cotton.  I like the texture of the Perle for an outline stitch.  Its a bit thicker than regular cotton floss and stands up a bit higher on the project.  


And a little trick my mother taught me is to lay a bath towel on the ironing board then put the piece face down on the towel and press from the back.  I use plenty of starch to get a smooth surface which also makes the stitching stand out.

Here's how it looked when I passed it on to Jane.


You can clearly see the piecing of the white background on the spools but that blend in once the finished piece is quilted.

And here's Dutchy the finished project.  It's the perfect size to fit on the rack she uses for wall hangings.  I can't wait to see it all done and hanging up next spring!


Next week, Round Robin #4 for Charlene.

Monday, October 6, 2014

Round Robin - # 2 Tami

I have Tami's project listed as Round # 2 but really it was the first one I got to do.  Carol's was the second one.  It doesn't really matter right at the beginning but as we get towards the end you'll see the progress on each project more clearly.

So this was what I got as the very first item to work on for the Round Robin.  Tami had created this beautiful center block.  She does wonderful hand applique work!  I have to admit I was a bit intimidated when I first pulled it out of the bag.  Per usual I hung it on my design wall for about a week or so for inspiration. 

Tami had a piece of fabric from one of our original group members, Mary Jane, who passed away several years ago.  She and Tami were very close.  Tami included the green fabric in the center of the cone flowers.  It was fabric that Tami had purchased on one of their trips to Pennsylvania.  She also added 7 blue circles to represent each of the members of the group and one gold circle to represent Mary Jane.


In her instructions Tami asked us to be sure to use a piece of the green "Mary Jane" fabric in whatever we created.  She also include in the bag some scraps of the other fabrics she used in case we wanted to use them as well.

I took the background and scraps from Tami and pulled some coordinates from my stash.  I  was really surprised to find so many pieces in my stash that would work.  


Doing another applique border at this point didn't seem like the best choice.  And I'm much better at piecing than hand applique!  So for my addition I created an angular border to contrast with the curves and circles of the flowers and leaves.  I was able to incorporate the Mary Jane fabric on the corners.  

Unfortunately, I didn't take enough pictures of the "building" of the border so I don't have much in the way of details on how it was constructed.  But you can see it's half square triangles set symmetrically from the center outward.   


The corners are half square triangles as well, just rotated to create a diagonal line.  Since I was not working with a pattern I had to do the math to get everything to fit.  Yes, math!  Not to worry, I don't mind math and I LOVE geometry :o)  I think that's one of the reasons I enjoy quilting, it's real life geometry. 


Here's how it looked when I passed it on to Jane.


Who would have predicted how beautiful this quilt top would become!  The combination of colors and keeping all the same background fabric made it look as if one person had done all the work.


Jane added the pretty appliqued border after me, Deb R added the bottom appliqued panel with her signature beeskeep, Charlene added another pretty appliqued panel at the top, Dutchy added the green border and pretty pieced side panels.  But Carol had the toughest job of all - adding the corners after everything else was in place.  Now that took some MATH!!  

We all loved it, especially Tami.  You can see that we have some very talented ladies in our group.  Learning from all of them is just one of the many things I enjoy about meeting up once a month.

Next weeks post will be Round # 3, Dutchy's signature block wall hanging.