Sunday, June 29, 2014

When You Don't Know What You Don't Know!


Most of you already know I started a new job back in March. (Yeah!  So happy and I love my new job!)  However, since then I have neglected posting but that doesn't mean I haven't been sewing and writing. So these next few posts will be catch ups, starting with the Hunter Star.

There was a long wait between landing the job and actually starting so I decided to tackle some UFOs that have been sitting around for a while.  This one is the Hunter's Star.  I started it in 2004 while at a quilting retreat at Threads Galore in Rangely, Maine.  It was a beautiful long weekend in the fall and the teacher was Deb Tucker

When I went to my first quilting class in 2000 I had no idea what I was getting myself into or how much fun I would have quilting.  By the time my sister Dutchy and I headed to the back woods of Maine four years later I was feeling pretty confident in my skills and ready to learn something new.  What I didn't know was that this project would take years to finish.

Here's a picture of the view from the lodge deck in Rangely.  This is what we were seeing as we sewed on the enclosed porch and had our meals in the dining room.  Just lovely!


Back to the quilting.  The quilt it self was a challenge for me because it required using templates.  This was done with an early version of the Rapid Fire Hunter's Star ruler that Deb Tucker invented.  We got a skinny ruler that we used to cut the strips but the new ruler looks much easier.  So here's what happens when you don't know what you don't know.

If you're like me you jump right in - buying pretty fabric, cutting out the pieces, learning the new technique, and sewing some blocks.  I have to tell you this "jumping right in" technique has resulted in more than one pot-holder from fabric that was going to be a bed sized quilt!  I call it building my stash ;o)

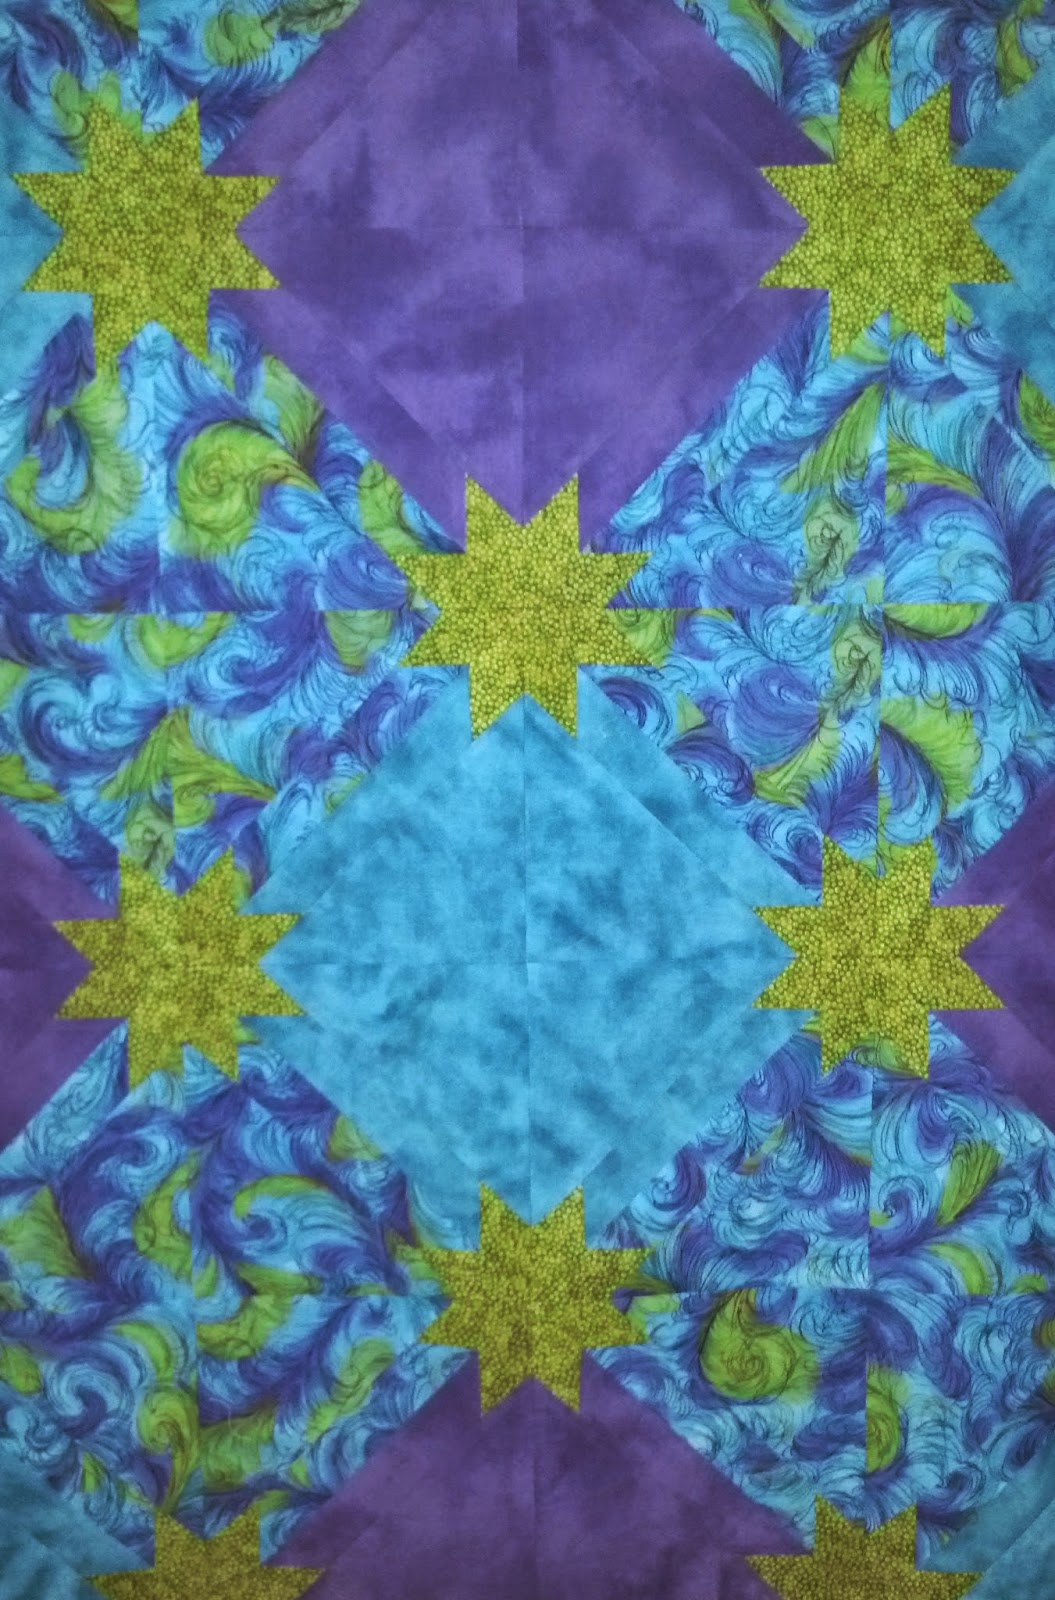
I had chosen this beautiful "feather" fabric as my inspiration for the colors in this quilt.  I was still pretty new at picking colors but I chose three coordinating fabrics with what I considered enough contrast to make the "stars" pop.  It's hard to tell in the picture but the colors are a light turquoise blue, deep purple, and lime green.  Sounds ugly but in person it's really beautiful.


I chose the green as the color for the stars but of course there are no stars in the actual blocks.  They start out as triangles like you see in the picture below.  It's not until you put them all together that you see the stars.  What I didn't know was the green of the stars would blend in with the green of the feather fabric and not be enough contract with the purple so that the star points got lost.  It was fine as I was building the blocks but you'll see what I mean in some of the finished pictures.


Notice the white looking edges on the solid blue triangles?  That's from washing.  This project had been stored in a box in my basement and it got wet when I moved.  By the time I found it there was a musty smell to all the pieces.  I had paid a lot of money for the fabrics and really loved them so I decided the best thing to do was wash all the pieces.  What I didn't know was washing and drying them would cause all of the cut edges to fray!  Oh yeah, and I didn't know that every single one of those green strips, blue, purple, and feather triangles would come out of the dryer looking like so much spaghetti!  What was I thinking?

After lots and lots of ironing, with plenty of spray starch, I finally got all the pieces to lay flat.  I was really worried about the triangles because of the bias edges but the starch helped tremendously in keeping them straight.  After all that I couldn't remember what the layout was supposed to be so I set the pieces aside again for another year or so.


As the years passed I would take the project out to give it another shot.  Somehow I couldn't seem to finish it.  I loved the colors but something didn't work and I couldn't put my finger on it.  So back into the drawer it would go.  When January rolled around this year I found myself home without a job and plenty of time on my hands.  Between writing resumes, cover letters, and job searching I decided that I would have plenty of time to finish up some of the old projects that were sitting around.  This one was on the top of that list!

When I took it out this time I was surprised to find that I had lots of the triangle blocks completed.  I tried to lay them out but couldn't remember exactly how it went.  Thank heavens for the internet!  I was able to search for images of the Hunter's Star quilt and see what was needed.  What I didn't know was that some of the blocks were sewn together wrong so no matter how I arranged them on the design board I just couldn't make it look right.


But I was determined to FINISH THIS PROJECT!  So I forged ahead. First I trimmed all the long edges of the triangles so that they each strip was the same width.  It didn't take much effort but measuring was important so I took my time.  Next I finished sewing all the triangles into blocks being careful not to stretch the edges - again, starch saved the day.

Now if you looked closely at the blocks you'll see that I had sewn a feathered triangle to a feathered strip with green tips. I also sewed a solid triangle to a solid strip with green strips.  Pretty!  I was so happy that it was finally all coming together.


But wait, something didn't seem right with this batch below . . . there should be a plain side and a feather side to the block.  Get out the seam ripper.  It was a pain in the neck but finally I got all the blocks made.  Still . . . something wasn't quite right but I couldn't put my finger on it.   


What I didn't know was I should have alternated the colors of the points on the trapezoid pieces so that it could have looked like this, see how the "star points" are different?  This picture is from my sister's beautiful quilt which I'll show at the end.  Her stars have alternating colors and it is just gorgeous!


Anyway, with all the blocks made I could square them up.  Finally, I was spiraling in on the finish.  I used the 8" square ruler and the 12" rotating mat.  What a quick way to get the job done.


I laid the blocks out on the design board and left it up for a few days to see if I still liked it.  As usual I moved the blocks around over the course of about a week until I finally got one I could live with.  I have to tell you I didn't much like it now matter how I moved the blocks.  After looking at it to the point of irritation I finally said enough already and just sewed the damn blocks together.  

I auditioned a couple of options for the borders and settled on this one.  I didn't have enough of any of the original fabrics so I used the purple, (which was what a I had to most of) and put portions of the left over blocks in as corner stones.


Here's what it looked like during the class in Maine.  That's Deb Tucker on the left helping me lay out my blocks while Dutchy keeps a close watch over us.


And here's Dutchy's layout, isn't it just beautiful?!  


And here's how my Hunter Star turned out.


In the end, this multi-year project, with all it's starts and stops is finally a finished top.  What I didn't know was, after all that, I would truly hate it!!!!!!!!!!!!!  I've often heard the expression there's no such thing as an ugly quilt but I have to disagree.  This quilt is ugly!  So it has been relegated to the Finished Tops pile and will remain unfinished until I'm ready to try my had at machine quilting on my home machine.  I doubt I will ever feel it is worthy of the money it would take to have it quilted by someone else.

However, I do think it is "cat worthy" and it may yet end up as a finished quilt assigned to keep the cats happy HaHa!

Friday, February 14, 2014

Charlotte Rose's Christening Quilt

Having a new baby in the family is so much fun!  We haven’t had one for several years and unfortunately, I don’t get the see them very often.   My great-niece, Lindsay, and her husband, Joel, live nearby so I get to see Charlotte Rose as often as I can.  She was born on Halloween last year, several weeks earlier than expected.  She’s a little bit of thing and cute as a button!  Here she is just home from the hospital with Mom, Dad, and their surprised/confused but loving dog Marvin.   (As you know I’m a cat lover but Marvin is one of very few dogs I actually like!)

Now before I get all crazy with the names and family connections lets start with this: my oldest sister Dutchy was married when I was just 3 years old and had her first daughter two weeks before I turned 4.  She was a very young bride, just 19!  That means my sister's kids are my age!  So while all the "great"s in this story makes everyone sound really old we're really not ;o) 

Maybe this will help, from left to right
Dutchy, sleeping Charlotte, Lindsay, and Sharon
This month Charlotte was baptized in the local church.  It was a fun family day!  It was pretty funny to see everyone (mostly the aunties and grandmothers) crowded around this tiny person just fascinated by her every move.  She was certainly the star of the day.  She wore the christening gown made by her maternal great-great-grandmother and worn by her mother, grandmother, and several other relatives at their baptisms.  It’s a beautiful hand-made gown with matching slip and bonnet.  The little shoes in the picture were made by her paternal grandmother.


I wanted to make a special quilt for Charlotte in honor of her baptism.  So I asked Charlotte’s grandmother (Sharon) if I could use her wedding dress to make the quilt.  Some of the lace from the wedding dress had been used on Lindsay’s wedding veil so it had already been cut up a bit.  I took the remainder of the dress apart and spent some time mulling over the possibilities.

First I had to change my design wall background to black by hanging up a black sheet to get some good contrast.  A quick shopping spree at the local fabric shop turned up some fun fabrics:  a sheer grey with some pretty flowers, another sheer piece in beige with a little bit of sparkle, two shades of pink satin, some beige satin, a shiny silver blouse from by crazy quilt scrap bucket, and some soft Minkie as a potential backing.  I pinned them all up on the design wall along with the pieces of the dress and some satin ribbon to get inspired. 

My typical mode of quilting is to put all the possibilities up on the wall and see what feels right.  This can sometimes take several weeks!  Well, I didn’t have that much time so I had to make some quick decisions.   The beige and pink satins were the winners.  The sheers were too busy and not the right colors to go with the white dress. 

The beige satin actually made the dress fabric appear much whiter than it really is.  After all, the wedding dress was going on 30 years old and had been stored in a box in the closet.  When I got it I took a chance and threw it in the washing machine.  I figured I didn’t have anything to lose, it had already been cut into right?  Well, it came out very nice.  Some of the dirt around the bottom didn’t come out but for the most part it washed beautifully!

I decided on a snowball block to make the most use of the white and the lace from the gown.  I used the darker pink satin on the snowball corners and alternated the beige satin squares with the white fabric from the underskirt of the dress. 
Then I cut lace squares (6 ½”) the same size as the finished snowball blocks.  I basted the lace onto the white and pink snowballs to get the overlay effect that was in the bodice of the wedding gown.  To minimize the pink and keep the focus on the white and lace I overlaid the lace on the pink.

Working with all the “fancy” fabrics was a challenge.  They were slippery and frayed easily so I did a lot of basting.  It was fast and easy to do and just made everything sit still while I worked.  I also used a dry iron on a cooler setting to make sure I didn’t burn anything!

I alternated the white/lace blocks with the beige blocks to give it a little interest.  I debated over using just the white but it was very blah even with the pink and lace.  The beige just added a little bit of depth.  It’s hard to see in the pictures because the fabrics are shiny but I think you get the idea.  There are better pictures at the end.  (And speaking of pictures I'm sorry these aren't better but I'm still using my phone to take them!)
 
I created a border with the white fabric from the underskirt.  It helped to frame out the blocks and bring the whole thing together.  Then I took the lace from the bottom of the dress skirt and used it as an embellishment on the border.  Since I was planning to “envelope” the finished quilt I had to sew the lace on the front/top of the quilt then add the border on top of that.

First I handed stitched in two rows of basting on the lace to be able to ruffle it.  Then I hand based and pinned the lace to the border before sewing it into place with the machine.  This was pretty tricky, and slippery, look at all the pins!


Here’s how the corners turned out.  I wish I had thought about the fact that the lace would be rounded so I could have made the borders rounded as well.  Still, the whole point was to have a quilt that would be a memento of the occasion and I know I accomplished that.


Now you won’t believe this but I didn’t take any pictures of the whole finished quilt!  I do have these two shots showing the lace border and you can kind of see what the whole thing looks like.


To finish it off I used the envelop method.  I didn’t include batting as I didn’t want to quilt it.  So technically it’s not really a quilt it’s a blanket but I’m calling it a quilt!  The backing is a cream colored plush with raised dots – I wanted it to be soft enough to use!  After turning it inside out I stitched around the border on the outer edge and along the inner edge under the lace.  This created a square that was just enough to keep the two pieces together without doing a heavy quilting pattern.


The size is 36” square.  Small enough to use on a tiny baby like Charlotte then pack away til the next baptism.  And best of all Charlotte and her mom loved it!


Once all the deciding was done, putting the whole thing together only took about two days – well, two very LONG days but it all worked out in the end and now it's my Friday Finish to add to Crazy Mom Quilts.

Now to clean up the lace and satin explosion that has taken over my sewing room.  :o)


Wednesday, February 5, 2014

Kim's Quilt

If you've been following along at all you know I've been on this quest to create a quilt for each of "The Girls".  As I thought about creating these quilts I've spent time thinking about what each of my friends means to me and the influence they've had on my life.  Our friendship of over 40 years has help shape my views and reinforce my values.  Kim is one of these wonderful friends!

Kim is a runner.  That's her in the picture below wearing the green shirt at the Maine Corp marathon in WDC.  She and her husband trained long and hard to be in that race and both finished!  Now I have no idea what it's like to train for or run in a marathon but it's one of the many things admire about Kim.

It sounds like such a final declaration to say she's a runner because the truth is Kim is much more than a runner.  Yes, she is an athlete but she is also a wife, a mom, a sister, an aunt, a grandmother, and a dear friend.  On my visits to our home town, where she still lives, I'd see her running the route of hills and valleys that lead past her mom's place near where my sister lives.  I typically wave but don't stop for fear of breaking her concentration.  I never asked her about stopping during a run but I figure if it was me running (NOT!) it would take me every bit of concentration and determination to be running on such a rugged course that I wouldn't dare to stop!

I am always in awe of anyone with such physical strength and mental determination.  I have never been much of an outdoor gal, even in my youth.  I was always wanting to sit around reading a book.  It was my friends (and my mother) who encouraged me to join in the biking, swimming, and skiing that kept us busy summer and winter.  I'm so glad they did!  I enjoyed it mostly because I was with them certainly not because of my grace or ability.

When Kim invited The Girls for an overnight stay it was the perfect time to deliver her quilt.  Getting all of us together in one place can be a challenge but we try to do it once or twice a year.  And there's usually one or two who just can't make it.  In this case it was Audrey and Mary so Kim made these fun "big head" cut outs to make sure they were included.  What a hoot!  It seemed, as always, that we had just seen each other yesterday when in fact we hadn't seen each other in months!  Catching up is easy because we do keep in touch with all the new fangled technology and occasionally a phone call or two.

During the summer before this get together I had been talking to Kim at a party.  She was telling me about the next big running challenge she was training for and I got that old feeling of envy.   Of how I wish I was more physically active and had the grace and beauty that comes from being tall, slim, and healthy.  Let's face it, I'm never going to be tall but I'd love to be slim and healthy!  And it's not envy in a bad way, it's more like inspiration, in a way that makes me want to do more.  To be better at going to the gym, at sticking with healthy eating, at getting outside to enjoy the sun and the fresh air.  While I love being inside working on my quilting there are days when I still feel like that 17 year old girl who'd just love to spend a day playing on the slopes with her friends! 

 
When I first began collecting novelty fabrics for Kim's quilt I chose a print with bras (it's an inside joke ;o) )and another one with woman's running shoes.  I was envisioning the vibrant, primary colors like lemon yellow, lime green, bright orange, red and blue.  I wanted to do something that would show the energy and fun of running.  But as I said earlier, Kim is so much more than a runner so I went in an entirely different direction.
 
I asked Kim what colors she likes and it was no surprise that she talked about the colors she has in her home.  The creams, browns, and beiges with touches of cranberry red and pine green, that make her home so warm and welcoming.  So instead of the cute novelty fabric of running shoes I decided to go with the warmth and comfort of fall colors to blend in with the colors she already has at home.  I knew I'd found the prefect solution when I saw these Timeless Treasures fabrics called "Leaves of Green".


I had so much fun making the disappearing 9 patch block for Betty's quilt I decided to use it again for Kim's.  I just love the way you start out with these big blocks sewn together to get a huge 9 patch.


Then you cut the 9 patch up to produce four smaller blocks seen below.  The one thing you need to consider when making this block is do you want any of the directional fabrics to stay in an upright position?  In this case, I didn't mind if the leaves were tipped and turned but I wanted all the birds to be sitting on the branches right side up not dangling down like bats. :-)  But that's just me, you may not care and I'm sure they would have been just a pretty, even upside down or sideways.


Then when you rotate the smaller blocks and sew them back together you end up with a totally different look.  And this is just one of many options for turning the small blocks - again for me it was all about keeping the birds upright.


The overall effect of the disappearing 9 patch is a bit scrappy.  Just enough for me to tolerate!  And since I have a hard time mixing up different patterns and colors in the same quilt this type of block gives me the effect I'm looking for without the stress of losing control LOL!  Maybe I'm a bit OCD.  Here's the finished quilt.


I didn't realize it until after taking this picture but there's a secondary pattern.  Can you see it?  It looks like large pin wheels and gives it a nice energy to the peaceful colors. 

For quilting I had Lorri do a large swirl that reminded me of blowing winds in the fall.
 

In the corners and borders there's an acorn and oak leaf motif.


As always for me one of the most fun parts of making a quilt for a gift is to watch the person opening it.  Kim was totally surprised!  Sorry for that bad picture Kim but I couldn't get one without the reflections beaming back from your running jacket!  Love, love, love the backing fabric by the way! 


And as you all know I hate a "honking big white label" on the backs of my quilts so I try to incorporate something more interesting.  In this case I used one of the smaller blocks from cutting up the larger 9 patch.  Trying to herd the cats and get everyone in the same place at once is usually a challenge so the inscription "Friends are always together in spirit" is very appropriate. And particularly appropriate for Kim as she's one of the hardest to catch up with. 


Now all of the girls, including Kim, knew they were getting quilts but they had no idea what to expect or when it would arrive.  I was just going to work on them and they'd get them when the got them.  (I didn't need the stress of 6 quilt deadlines in my life!)  In this case, I finished the quilt in December 2011 just before Kim's birthday but didn't get it delivered until February 2013.  Oh yeah, and I'm just finishing writing about this one in 2014 . . . I know, I know but don't judge me!

While we were stating at Kim's that night nearly a year ago it snowed as we slept.  In the morning we woke up to over a foot of new snow.  The more hearty of the bunch went for an early morning walk.  I would have loved to have joined them but I'm not crazy, I know my limits.  When they returned we started digging out and preparing to head home.  So I got that chance to spend some time outdoors with my friends!  LOL!  Mostly though, the guys did the shoveling and snow blowing, while the girls cleared off the cars.


And the get together at Kim's was just like all the other times The Girls get together; lots of food, fun, "remember when", and new memories.  So when's the next get together for The Girls?  Who knows, but I'm sure it will be a blast!


Saturday, February 1, 2014

Christmas Village Pillow

Here's a finish that's been waiting to happen for over a year!  It was supposed to be a quick project to pull together before Christmas 2012 and have ready for gift giving. 

HA!  I always have great ideas at the last minute and those are the ones that typically turn into UFOs (unfinished objects).

The pattern is "Holiday Lane Pillow" .  Of course when I saw it and thought it was so cute and would be so quick I wasn't planning on making more than one.  Then I pieced together the first one.  It really was so fast I thought well, all the fabrics are here and I'm moving right along, why not make 3 more!  Aren't they just adorable?  The trees, windows, and snow on the roofs are all fusible applique. 

I experimented with the white fabrics a bit.  I tried a brushed flannel but it was kind of stretchy so I didn't use it.  Then I tried a "craft" fabric that's fuzzy on one side and smooth on the other.  The feel of it was great and it looked just like real snow.  The problem was as soon I started pressing the pieces down it lost it's fuzz and didn't look that great any more.  That's actually the one I finished into the pillow above.

I finally settled on a white that has a bit of a shine to it.  Kind of looks like snow that has melted and refrozen.  It's really pretty!

Once all the panels were made I wanted to include some embroidery to perk it up a bit.  This meant more time was need and they wouldn't be ready for Christmas so I put the whole project aside until spring last year.

When I picked the project up again I figured it was early enough in the year and I'd have them all done by Christmas (2013).  I embroidered the first one and really liked it.  Here's a close up.

In the meantime, I was working a quilt for my sister-in-law (more on that later).  So again the village pillows got put aside.

The next time I picked it up was to have something to take to my monthly quilt group.  By now I had forgotten which stitch I used to outline the door and window so I had to look it up. 

I found this great website with a whole library of hand embroidery tutorials.  If you're interested in adding some new stitches to your embroidery you should check out Needle'n'Thread by Mary Corbet.  Be prepared to be inspired!  I think I've watched almost every one of her videos multiple times and it has sparked a new interest for me in embroidery.  Oh great, another whole world of UFOs!!!

I finally completed all the embroidery over the weekend and finished the first one as a pillow.  I didn't actually quilt it so technically it's not a "quilt" project but it's done.  Now, I really like the pillow but honestly, the thrill is gone and I don't want to make any more pillow covers.  At this point I'm torn between making them into individual table runners or just sewing them all together as a small quilt.  This much I do know, the unfinished ones are heading back into the UFO pile.  Or maybe I can just call these WIPs (Works In Process)!

Do you have projects like this that keep coming back begging to be finished? 

Sunday, January 26, 2014

Oh, that's where that went!

Like most people I have many projects that I started but never finished.  Some quilters call them WIPs (works in process) or UFOs (un-finished objects).  I call them "Oh that's where that went!".  I have several areas in my sewing room where I put stuff for safe keeping. 
 
You know the stuff I'm talking about?  That group of fabrics that are just made for each other so you can't break up the set.
 
This one is "Rachel's Basket", so pretty and feminine.  Just about my favorite colors, pink and green, in pretty floral prints.  This is going to be gorgeous!

 
Or how about the one where there's just a few more blocks to go - this one below actually did get finished last September and it's now happily residing on the back of my favorite comfy chair.

Or then there's the that 30 minute project that you're going to do the next time you have just 30 minutes to sew.  I've been wanting to make some mug rugs for ages now!  Isn't this one cute?  These are in my on-line file of table top quilting stuff.


And how about that baby quilt pattern you just fell in love with and had just the right fabrics all from your stash?  This one is called 'Tea Party" and it's a snowball and 4-patch layout.  I found all these pretty pastels in my stash but have I done it yet? NO!  They're all in the green basket near my sewing chair.


My all time favorite is when you bought those special fabrics, in those specific colors, for a particular person . . . .and then changed your mind!  These fabrics were supposed to be for my friend Kim's quilt. 

 
But after several block tests I changed my mind and went with fall colors and these beautiful chickadees from Timeless Treasures instead. She loved it so I guess it was the right choice!  Now I just need to write the blog post that goes with it.
 
 
My method for keeping track of all of these projects is to put them in a neat pile somewhere sewing room.  They could by in (or on) the green basket beside my sewing chair, on the 3-tiered cart near the design wall, in the wicker basket near the window, or even in the bins under my sewing table. 
 
 
All I really know is when I'm looking for a specific project I usually come across something I wasn't looking for that makes me say "Oh, that's where that went!"
 
How do you keep track of your unfinished projects?