Pages

Thursday, September 27, 2012

Marian's UFO's

Have you ever tried to work on a UFO (Un-Finished Objects) that someone else has started?  It's tough enough trying to finish up my own unfinished projects but to take something that someone else has started and try to finish it is really a challenge.  It's not something I've done much of and I can tell you after this experience I won't be doing any more any time soon! 


A while ago my sister and several of the girls in her Monday quilt group lost one of their regular members.  When Marian's family got around to cleaning out her house they had no idea what to do with all her crafting/sewing stuff.  I had never been to Marian's craft room but had heard stories of how lovely it was and how much stuff was in it.  She was involved in quilting, knitting, rubber stamping, and other crafts/hobbies.  So much so that her husband had a craft room built to hold all her stuff.  I often heard the girls talking about going to Marian's to enjoy group sewing or other projects.


After the family had taken the items they were interested in, Marion's husband invited the "Monday night group" to come over to the house and help themselves to whatever they wanted.  Each of the girls had received so much stuff that I understand it took them several visits to clean the whole room out.  While I didn't participate in the clean up I was lucky enough to receive several kits and a selection of fabrics from the stuff my sister Dutchy had received.  In fact it was a whole storage tub full of stuff!
 
The fabrics are beautiful!  And there were lots of kits of all different types and sizes of projects.  I selected several of the smaller table runners and place mats thinking they would work up quickly.  I hadn't touched anything in the that tub until last winter and what a surprise!

Occasionally one of the girls in my Friday group will mention that they had picked up one of Marion's projects to finish.  The comments were always the same;  poor Marian, she must have used some of the fabric from the kit on another project; or isn't this one of the patterns we did in class, it seems to be missing some pieces; or I tried to finish this project but the pieces are cut wrong. 

You see, Marian was in it for the fun not the finesse!  She had enough money to buy whatever she wanted, and her husband indulged her, so she often had two or three (or more!) of the same kit or piece of fabric.  She's buy several yards of fabric at the quilt shop then come in the following week and buy more of the same!  We all chuckled because we all wish we could do that!

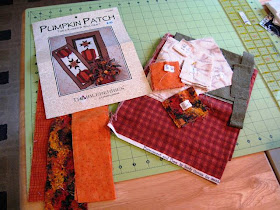
So when I finally got around to tackling some of those UFOs from Marian I saw for myself that all the comments from the girls were true.  The first project was the Pumpkin Patch table runner - it was missing some of the beige background fabric so I substituted with one from my stash.

Next I tried the Bunny table runner.  This one wasn't missing anything.  In fact it had enough fabric to make SIX table runners!  LOL  I guess she was planning on giving these away.  She had completed four of the bunny faces and cut some of the other pieces but not all of them.  I decided to finish just two of them and put the rest of the fabric in my stash for another project.

And lastly I tackled the Christmas place mats. These were a puzzle.  She had the triangles cut but I'm not sure what pattern she was following!  And since they were cut on the bias, well, lets just say they were a bit "wonky"!  Again I substituted the red for some fabric I had in my stash and I think they came out pretty good.

I spent about two weekends working on these projects and when all was said and done I enjoyed the challenge and spent some time fondly remembering a quilting friend!  I have to admit I only completed the piecing on the 3 table runners and 2 place mats.  I decided that the next steps, quilting and binding, would have to be done by someone else so I returned them to my sister.  I'm not sure if she's done anything with them but now she can have some fun and fond memories of Marian too.


Wednesday, September 26, 2012

Stephen's T-Shirt Quilt

Over a year ago I had a phone conversation with my friend Diane who told me that she had recently heard about a T-shirt quilt.  One of her co-workers was going to put her in touch with someone who could make one for her with her son Steve's sports T's.  He played sports in school from 1st grade through high school and beyond.  After looking into it she was surprised at how expensive it was going to be but she still wanted to do it.

As the conversation went on I remind her that, seeing's how I'm a quilter, and seeing's how we're friends, I would be happy to do it for her - for nothing.  She was surprised and happy all at the same time.  She happily agreed and still insists that she wants to pay me but I insist on doing it for the fun of it.  ;-)

So began the T-shirt quilt adventure.  Stephen's T-shirts have been sitting in a basket in my sewing room since just after we had that conversation. 

Notice I said that this was "over a year ago" that we had talked about it?  Yeah, well, fortunately she wasn't in a hurry cuz I'm a slow poke!


Here's the basket of 17 "whole" shirts about to be clipped.
After searching the Internet, and reading though a book I bought on T-shirt quilts and several consultations with my favorite quilting buddy (my sister Dutchy), I dove in. 

The process goes like this:

Dig up all those old T-shirts you just couldn't part with and get the washed.  Find a design you like.  Well, some people would start with a design in mind but I'm going to see where all these colors and numbers take me.  I love a surprise don't you!

Next cut the design out leaving as much fabric as you can so you'll be able to cut them to size later.  These were some of the smaller shapes I cut.  For most of these shirts there were designs on the front and numbers on the back.  I'm certain the numbers are going to be fun to work with.
 
The team names are mostly long and narrow like the St. Matthews above. 
You can discard the necks, sleeves, and other scraps.  Well, in my case, I'll hold on to them until I get a better feel for my final layout.

Necks, plackets, sleeves and hems, Oh My!
After figure out the largest of the designs on the shirts I cut them down to a size about 2 and a 1/2 inches larger than the that.  So in this case the biggest designs were around 10 inches.  I used my 12 inch square and a ruler together to come up with a 12 1/2 in square. 


This gives me enough space to iron on the stabilizer without getting the glue on my iron or ironing board.   It's still only a rough cut and they will be trimmed again later before sewing.

I cut the stabilizer into 12 inch squares and iron it onto the back of each shirt square.  One other tip for the stabilizer, I used a non-stick and heat resistant pressing sheet to keep the T-shirt designs from sticking to my ironing board.  

For stabilizer I'm using Pellon JAS Fusible Interfacing (# P44F) that I bought by the yard at Joann's for $0.99 a yard with a coupon!  It was so cheap I bought 7 yards which means I'll have plenty left over for when I start that concert T-shirt quilt.  Don't use "feather weight" stabilizer, it's too flimsy.


That notch is where the placket was and has definitely
been a factor in cutting out the designs.
I was so proud of my self for getting the shirts all ready to start my design!  Then I remembered that Diane had said she has one or two more shirts that she thought would be good to use.  Problem was Steve's still wearing them!!  I texted her to see if she had gotten hold of Steve to get permission to use them.  Here's how the texting went:

Debby:  Do you have any more T-shirts for Stephen's quilt? Some from high school?
Diane:  I will look.  Hang on before cutting them up if haven't already.
Debby:  OH NO!  Too late!  I starting cutting them up on Sunday! I wanted to surprise you :-(
Next was the sound of my phone ringing.  It was Diane.  I was near tears and she was laughing.  Turns out she thought I didn't have enough shirts and was fine that they were all cut up.  PHEW!  Crisis averted.

Anyway, I have been wanting to make a T-shirt quilt for a long time. I've had my eye on several boxes (!) of concert T-shirts dating from the early 1970's (Rod Stewart) through my most recent outing in 2012 (Madonna). 

Alas, I can't get the professed "co-owner" of the concert shirts to let me have my way with them. They're mine but many were purchased by him, for me, and he (unlike Diane) is adamant about NOT cutting them up. He's softening a bit as the years go by but . . .  I'm leaving that battle for another day and moving on to make a T-shirt quilt for Diane/Steve.

Wednesday, September 19, 2012

Travels, Aprons, and a Quilt


Summer 2012 is finally winding down.  "Finally"?  Did I really say that?  Yes!  It's been a busy few months for me and I'm glad to say I've been home a couple of weekends doing some sewing.  Since the beginning of June I've been to San Francisco (work), Boise (Mary), Orlando (more work), San Diego/Los Angeles (adventure!) and topped it all off with a trip to Maine (vacation).  All these trips were fun and tiring!  After returning from vacation in Maine it has taken me a week to catch up on laundry, e-mail, housework, and oh yeah, my job.  

Now that I've gotten back into my regular routine and "semi" back to my diet ;o) I'm ready to add sewing to the list of things to do.  So before I get to work on the pictures for the post on Mary's quilt I decided I needed to do a little sewing to get back in the grove. 


Tea Towel Apron

To get my creative juices flowing again I started a new project.  We had a bridal shower last weekend that we needed to make 4 aprons for.  "We" (that would be me and my sister Dutchy) had planned to get together and make these aprons over the summer. 

We are both experienced seamstresses and accomplished quilt makers but, as they say, timing is everything.  You can see from all my travels listed above I wasn't available much plus I still work full time.  Which is only half of the equation because Dutchy is retired and as far from sitting home in her rocker as you can get. 

Needless to say it was getting down to the wire and although we had started to make one apron the whole project just wasn't going well. There were too many parts to the apron and the colors weren't right.  So I went searching on the Internet and found the cutest apron pattern tutorial on Missouri Star Quilt Company site. 

It's an apron made from a single tea towel and a little bit of fabric.  It has an adjustable strap and can easily fit any size from adults to kids. I just love the way the strap is one long piece of binding and it slides through the sides of the apron to the top and back down the other side. 


I showed a sample to my sister and she loved it too.  Now she wants to show her craft group how to make them.  I hope you like it as much as I do!  The video is two short (less than 3 minutes each) tutorials and she give you all the dimensions.


I tried using some fabric from my sister's stash but the main color theme for the shower was purple and this fabric was orange, yellow, and green!  They are fun fabrics for a kitchen but not for this shower.  I finally figure out that there wasn't enough contrast between the apron fabric and the pocket fabric.  It looked OK but not WOW. 


Since I didn't have any tea towels with purple in them (that was the theme color for the shower) I went in search of fabric and found this swirly one. 

 
And this beige one.


I made the "tea towel" ones for the brides maids and they came out really cute but I didn't get any good pictures of them!!  Here's one of the bride's maids wearing one but it's pretty blurry.  Anyway, can you believe that's the size of a tea towel?  She's an average size woman and it fits her fine.


Here's the top of Heather's apron.  Hers was more detailed with beige binding and white rickrack.  I love how it turned out but it was kind of big when she put it on at the shower so she didn't wear it.


But the real star of the shower was the quilt that Dutchy made for Heather for the wedding.  It was a big hit with Heather and the crowd too.  Beautiful work Dutchy!!  The pattern is "Apple Blossoms" and it is gorgeous!


Heather and her Nana Dutchy with the
quilt Dutchy made for the happy couple.
After taking pictures all day long at the shower I was so disappointed to find that most of them were blurry and can't be used.  This one of the quilt was one of 3 that came out good.  I've been struggling along with my camera held together with duct tape for a while now.  I guess I'll just have to go get a new one.  That sounds like a plan!

Friday, September 14, 2012

Quilting on the Teacups Quilt

Gee, it seems like forever since I've have the time to sit and write.  I'm squeezing this one in before dinner!

In my last post on Jean's quilt I didn't have a chance to show off the quilting.  It was done by Lorri Wurtzler at Seventh Heaven Quilting in Nashua NH.  She's been just great to work with!  I spend so much time there I'm worried she'll start charging me by the hour for all the talking I do!  She always listens to what I'm looking for and usually has several ideas for me to consider.  I love that it's a collaborate adventure!

For the teacup quilt I wanted something floral and open that could be seen when the quilt was hanging.  I chose a rose pattern with leaf motif for the background quilting and asked her to outline each of the tea cups.


I went with a light blue thread on the front, again so it could be seen when the quilt was hung.  The picture above shows the prairie points really well.


I love the way each teacup is outlined and the square around the tea cup is stitched in-the-ditch.  It made teacups really pop.


A rose is centered inside each star with the leaves going out into the cream background.  I love, love, love this star color.  In real life it's more of a perriwinkle color but it's just beautiful.


The same rose pattern is used in the borders.  I love the way each rose appears to be sitting on a "saucer"!  The light blue thread works well on the dark blue fabric too.

 
I didn't get a good photo of the back before I gave it away but here's a peek at it.  The fabric is an overall rose pattern which unfortunately just looks like a mottled light blue in the picture but it really is roses and it was the inspiration for the quilting.
 
 
Seeing this quilt made me fall in love with it all over again! 
 
Next up?  Delivering Mary's quilt in Idaho!  And my friends say "Thank You" with a lovely gift and group hug!  Stay tuned.